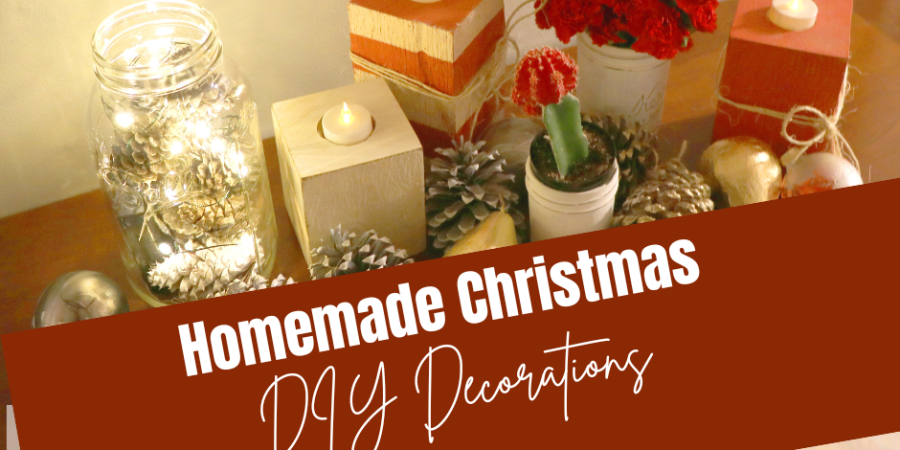
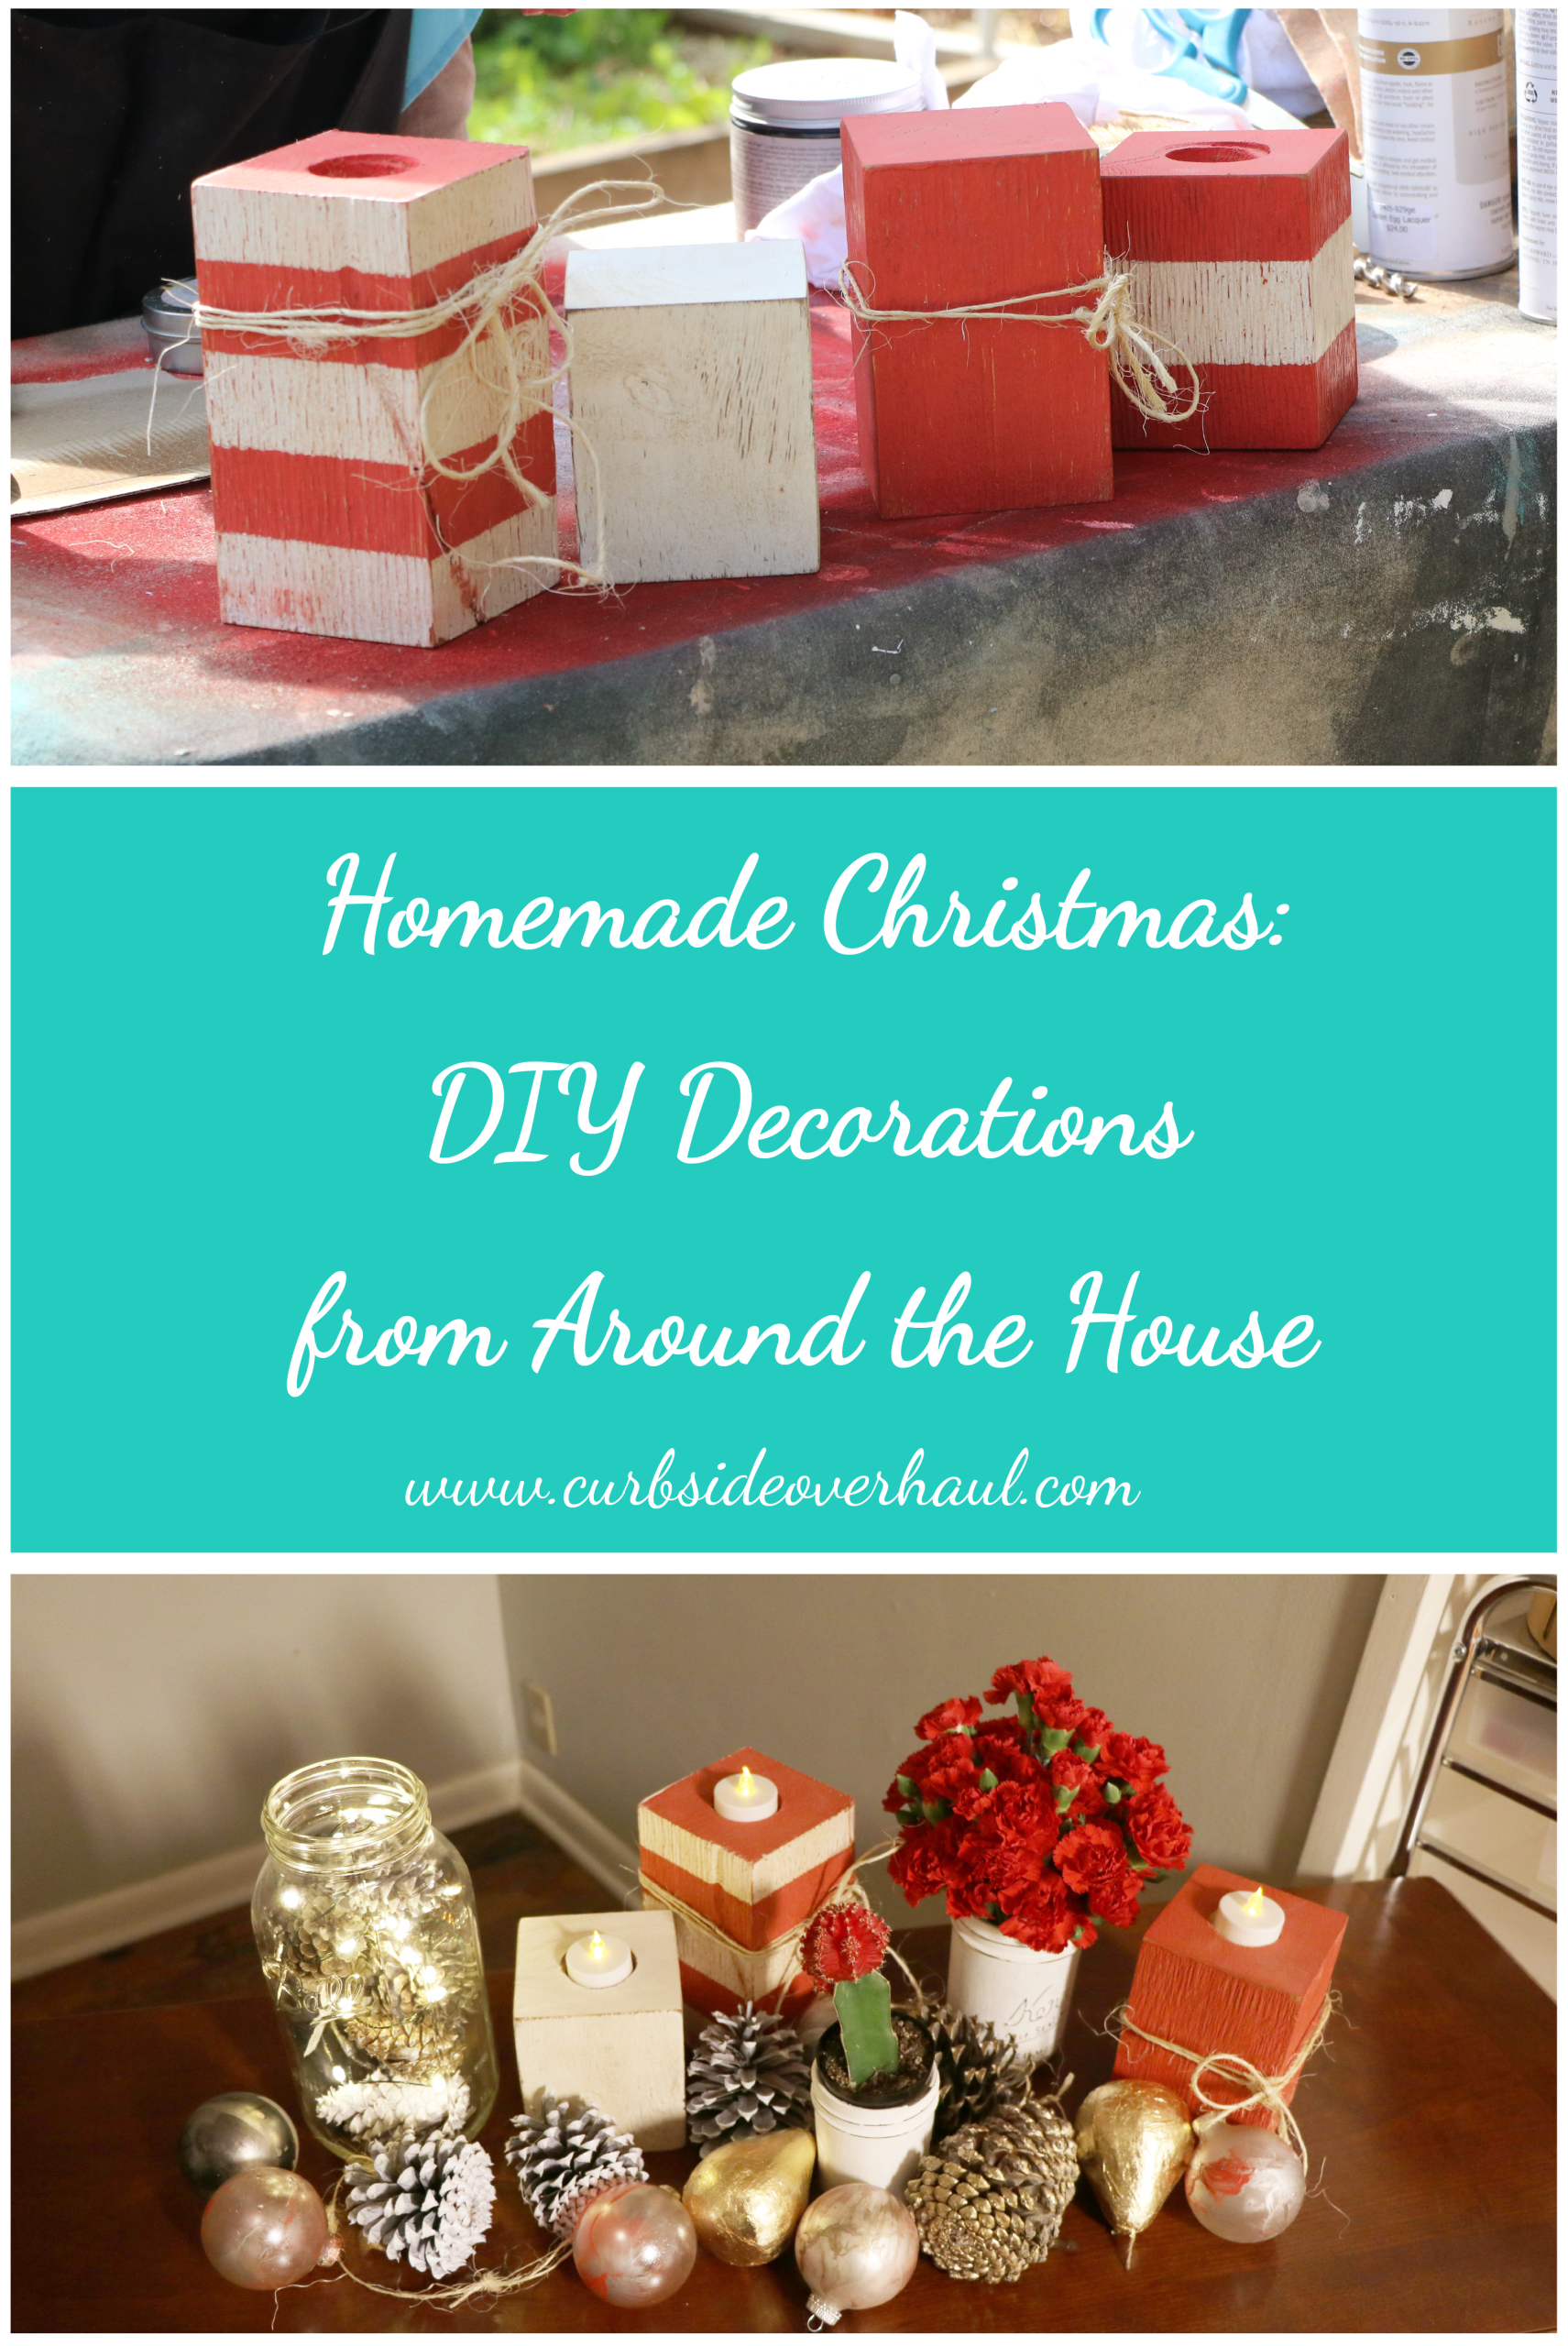
Our Homemade Christmas
I’m super excited because we have not one, not two, not even three, but four homemade Christmas decoration ideas to share with you today. Many of these homemade Christmas decorations can be made with the future in mind, so you can use them all year long. Another great thing about these projects is we tried to use things most people might have leftover from a different project or lying around their house. Most of these projects don’t require too much paint either, so if you have a little left in a jar or can, these are perfect to help you finish it off.
NOTE: These projects were originally on a website I no longer host, so I transferred all the upcycled projects to this website.
So let’s get started!

Our first homemade Christmas project can really be used during any time of the year because you can choose a neutral shade to go with your other Christmas decorations or you can choose another color to go with your home decor. You can use them as a vase, organizer in the bathroom, candle holders, and literally hundreds of other ideas. Because One-Step chalk-based paint sticks so well, it’s the perfect paint to spruce up all those mason jars you’ve collected over the years.
Repurposed Mason Jar Vases
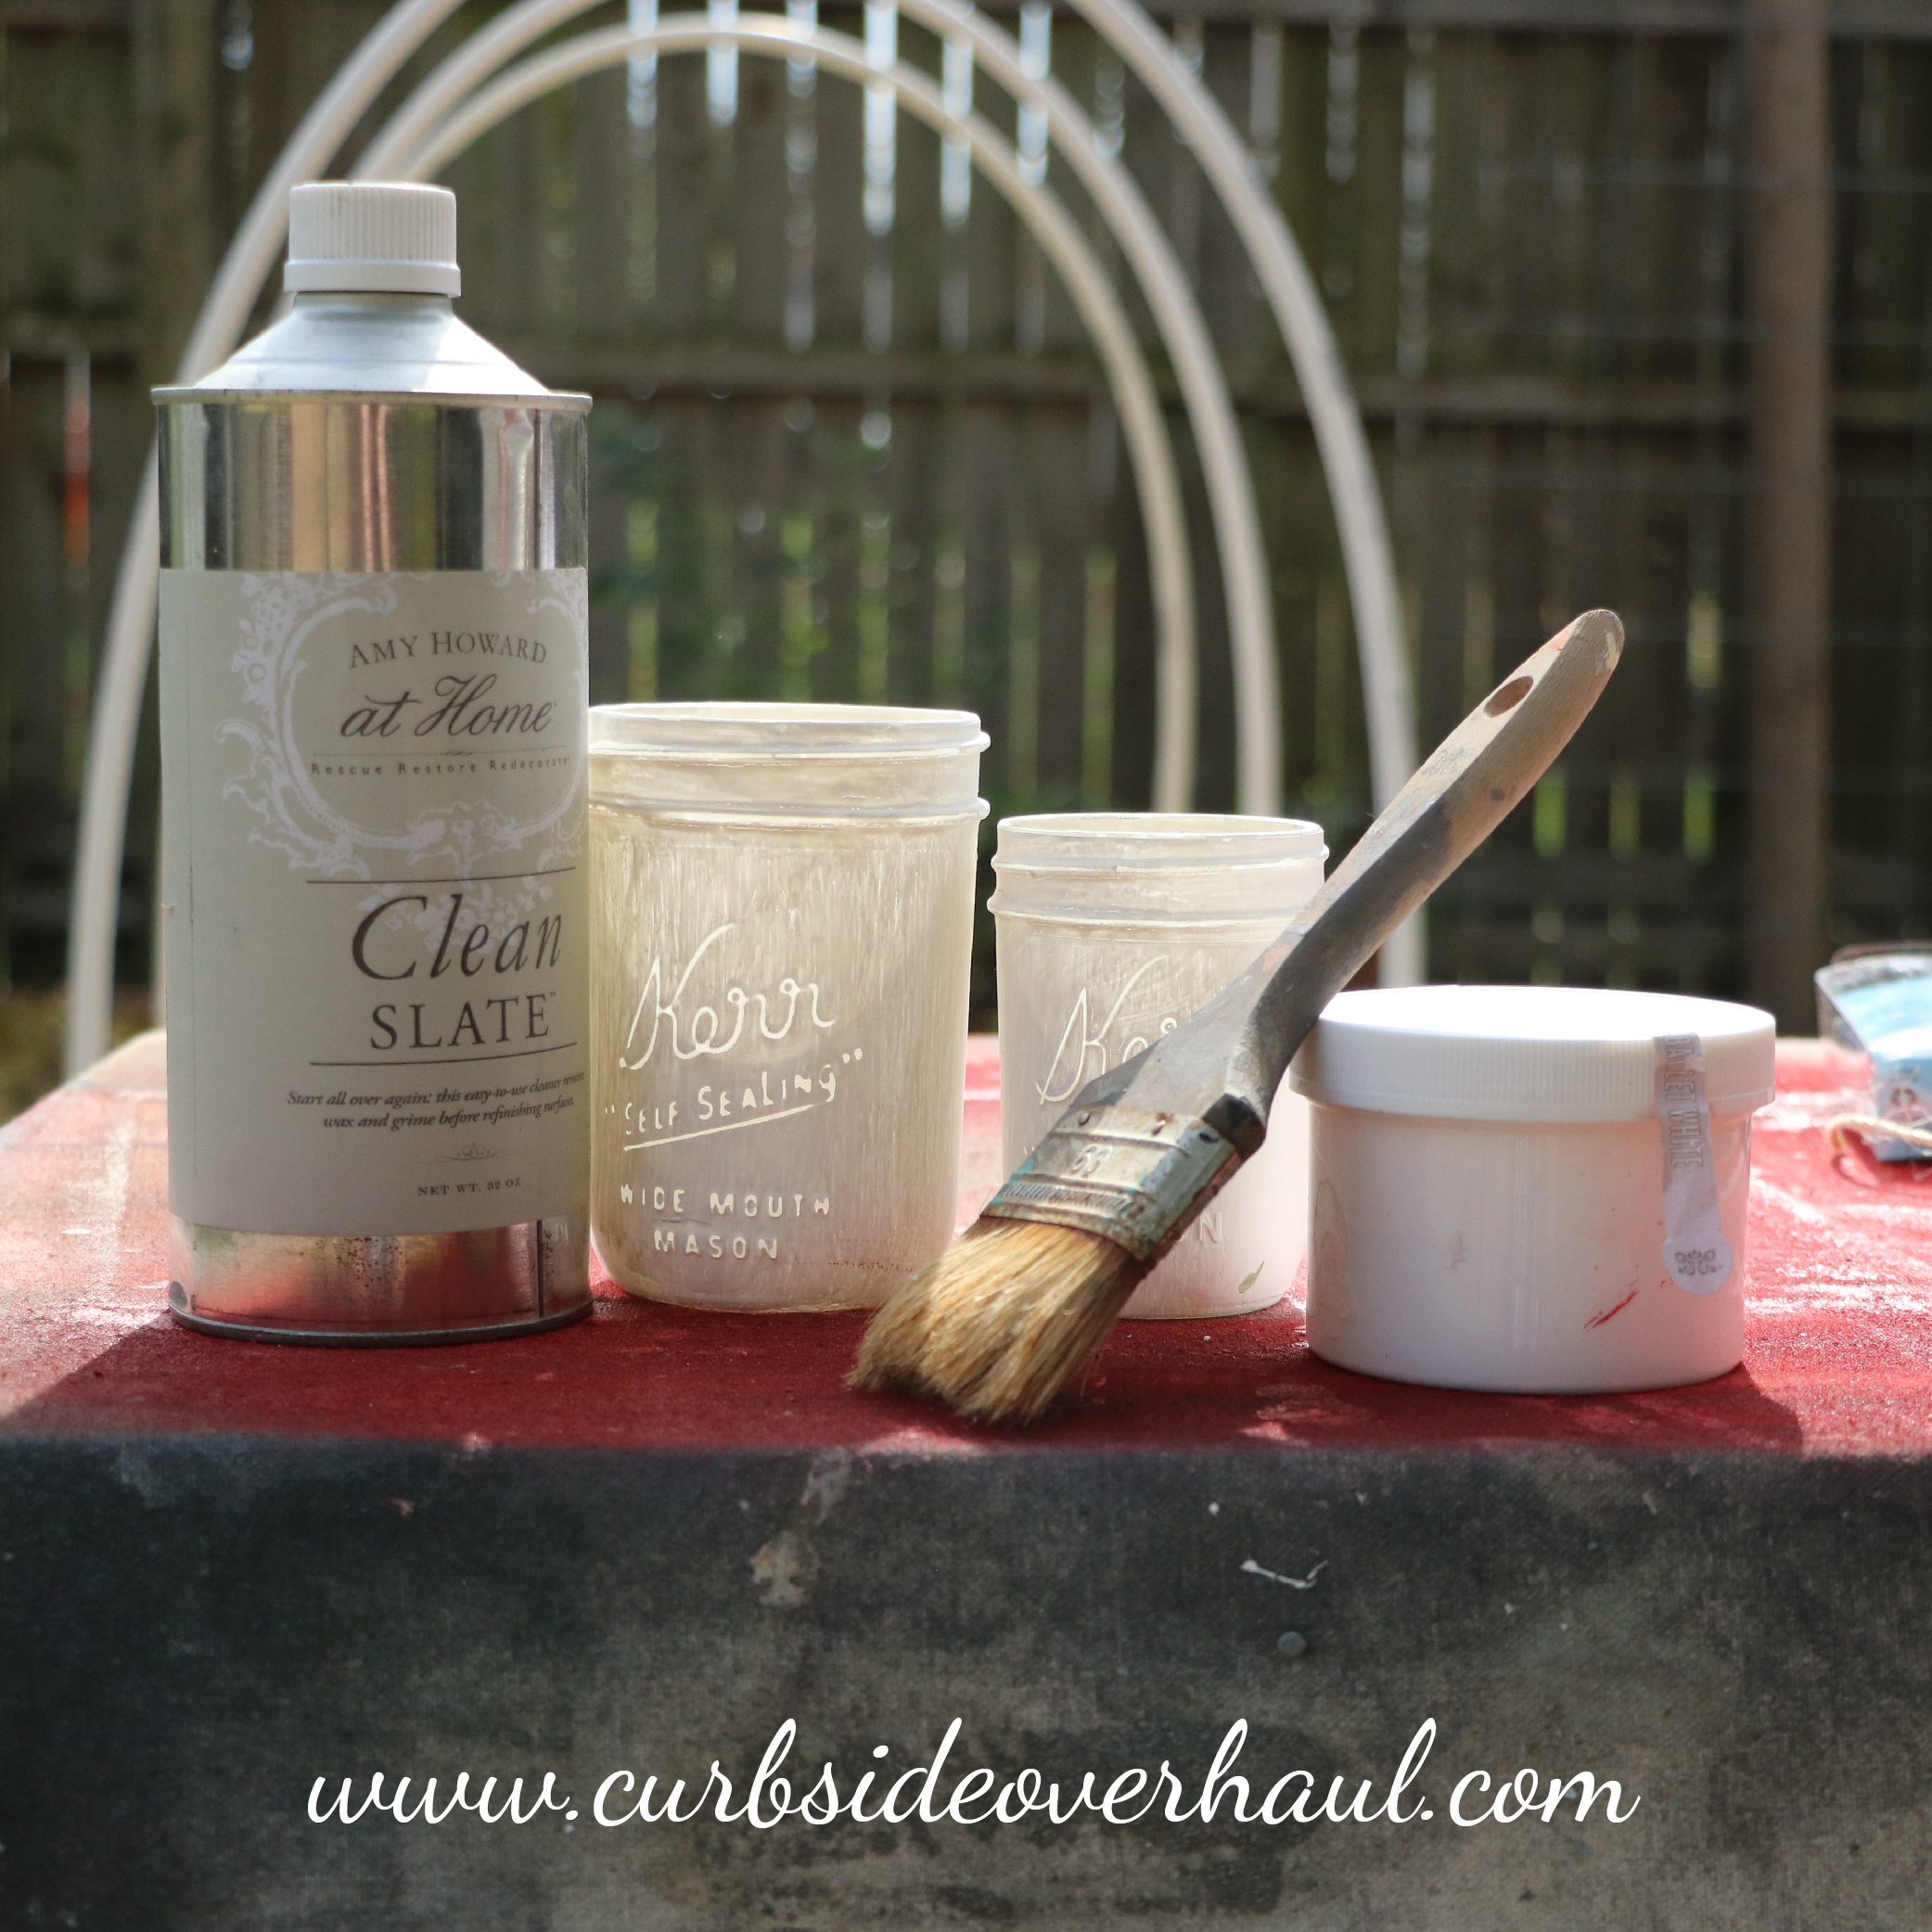
Materials Needed:
Clean Slate
Mason Jars
One Step Paint (Ballet White)
Sandpaper
Brush
Step One: Clean
Wipe the jars down with a lint free rag and Amy Howard’s Clean Slate. Once the jars have dried, you’re ready to start your project.
Step Two: Paint
Paint the outside the jars with the One-Step color of your choice. We chose Ballet White, so it would fit with our Christmas theme, but this is a great neutral decoration to use all year long, so choose a color that suites your decor. Make sure as you paint, the lines of your brush goes in the same direction.
Step Three: Apply Second Coat
These jars need at least a couple of coats. Chalk-based paint dries fairly quickly. Because of the dead flat finish, you will know it’s dry when there are no shiny spots left in the paint.
Step Four: Sand Letters
Once you are happy with your coverage and your project has dried for at least an hour, it is time to sand. On our jars, we wanted to the letters to stand out, so just we sanded the paint off the tops of the letters.
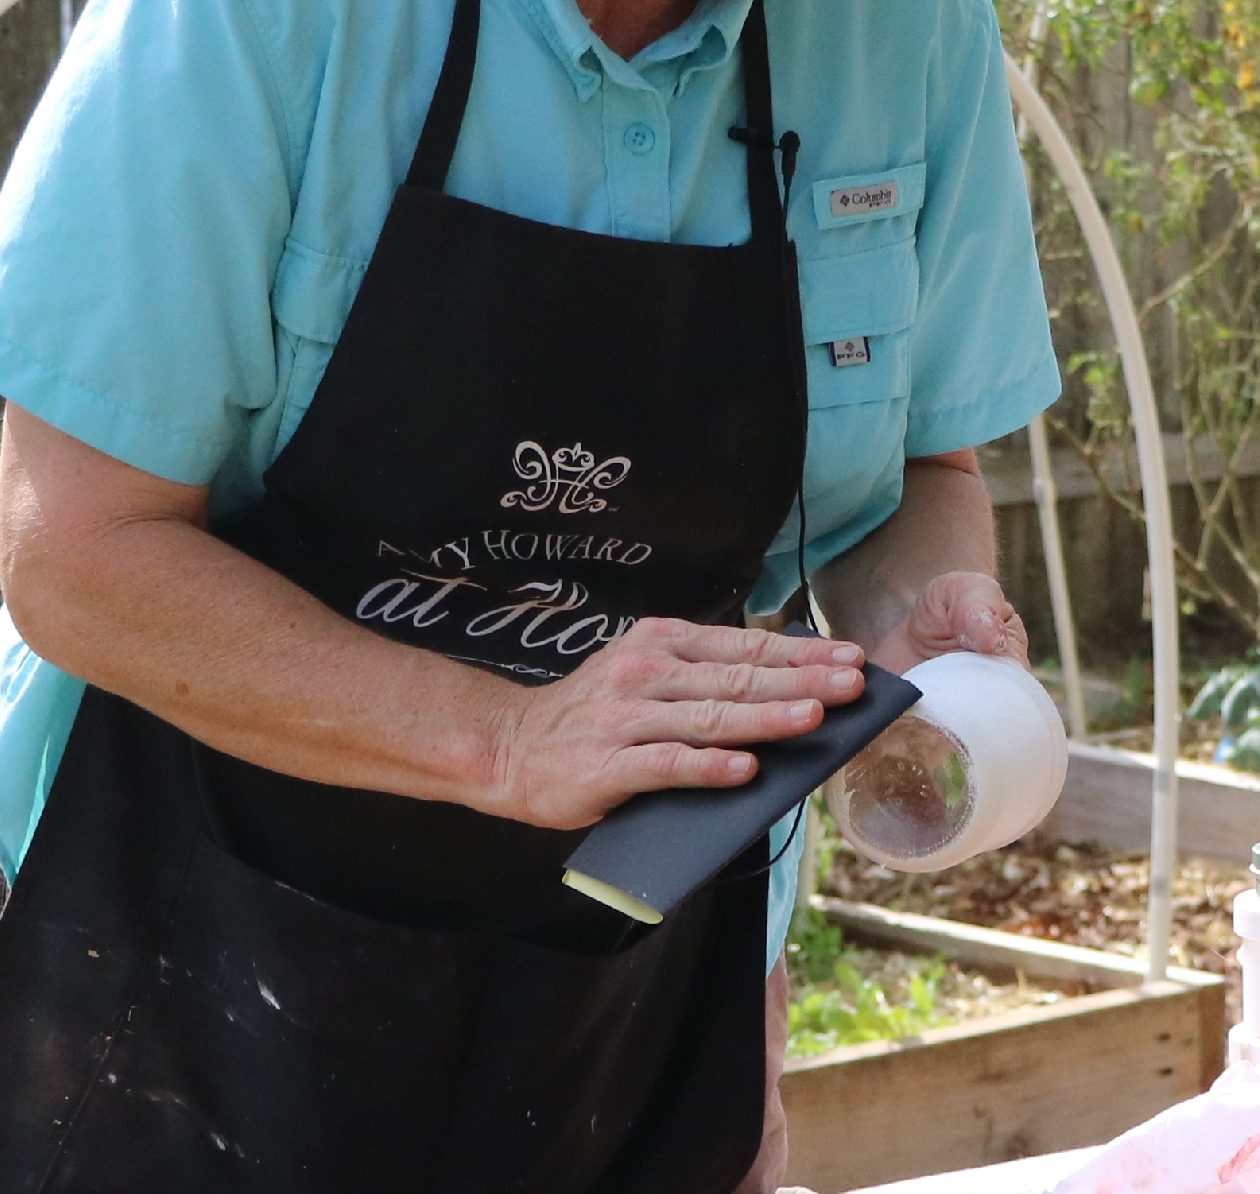
The sanding took quite a bit of effort, which is a testament to how well One-Step paint sticks to substances such as glass.
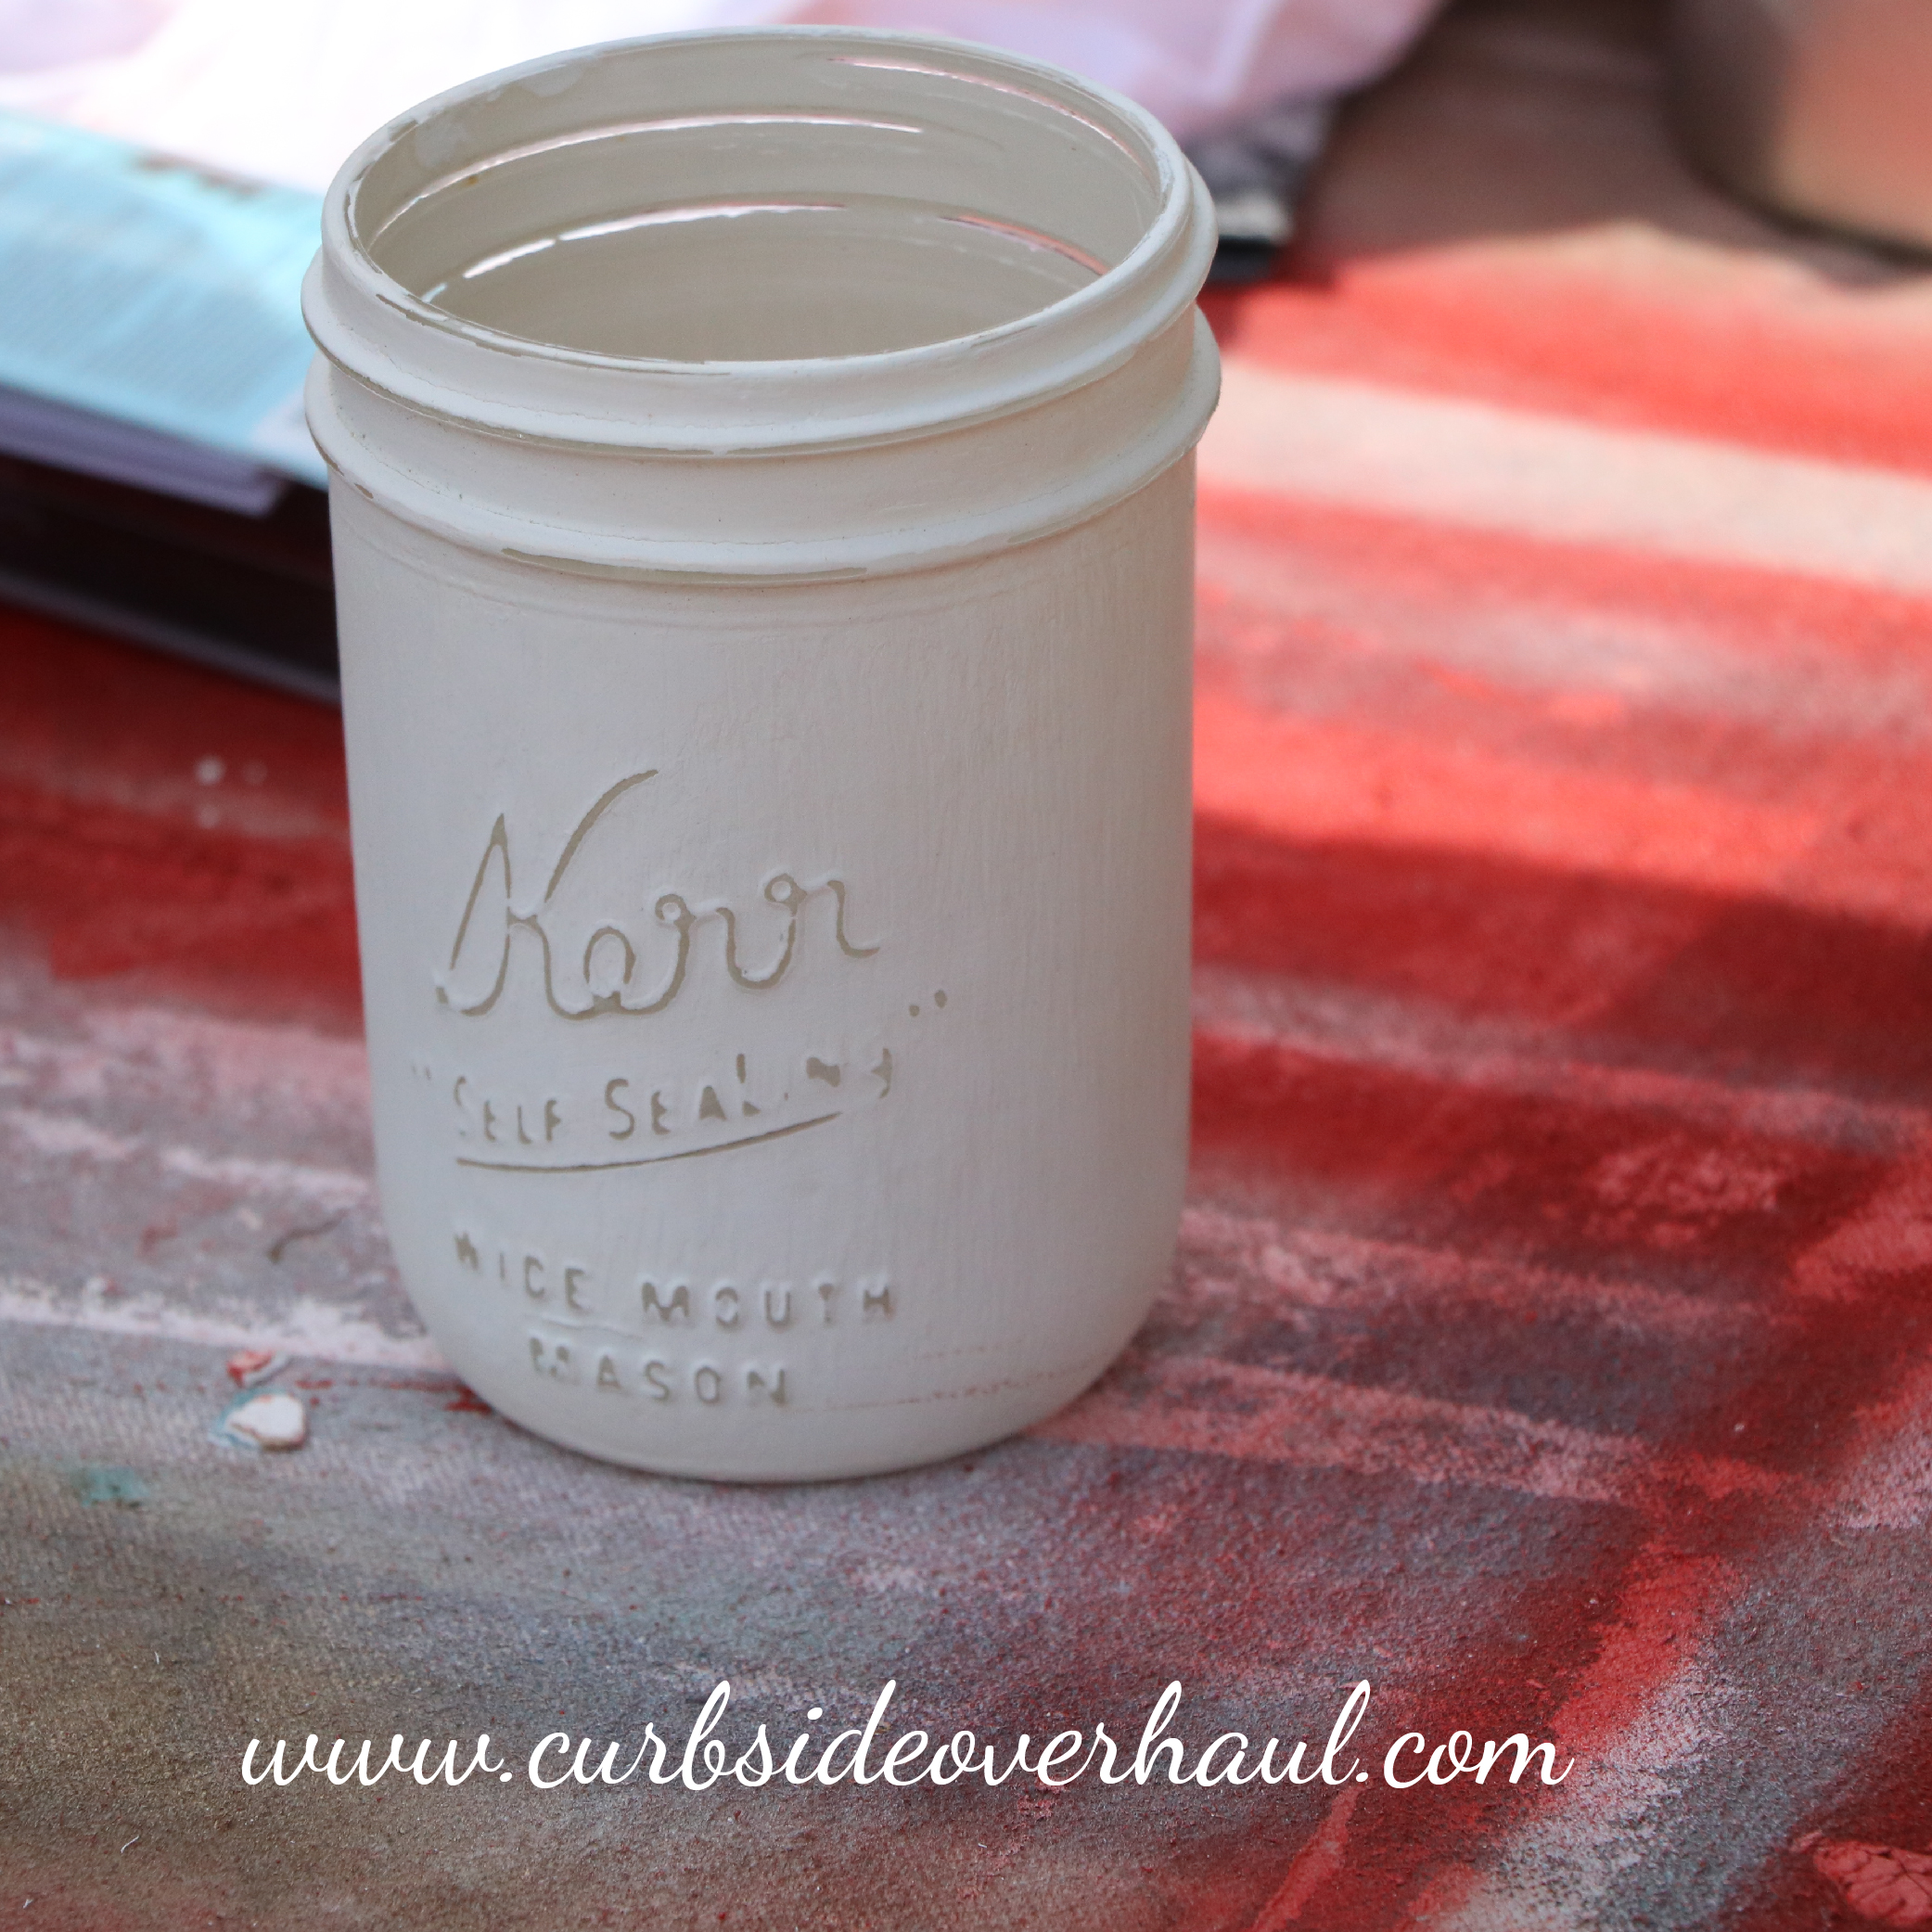
And now you have a project to showcase your Christmas decorations, serve as a gift for a loved one, use as storage in the bathroom or to showcase seasonal decorations all year long!
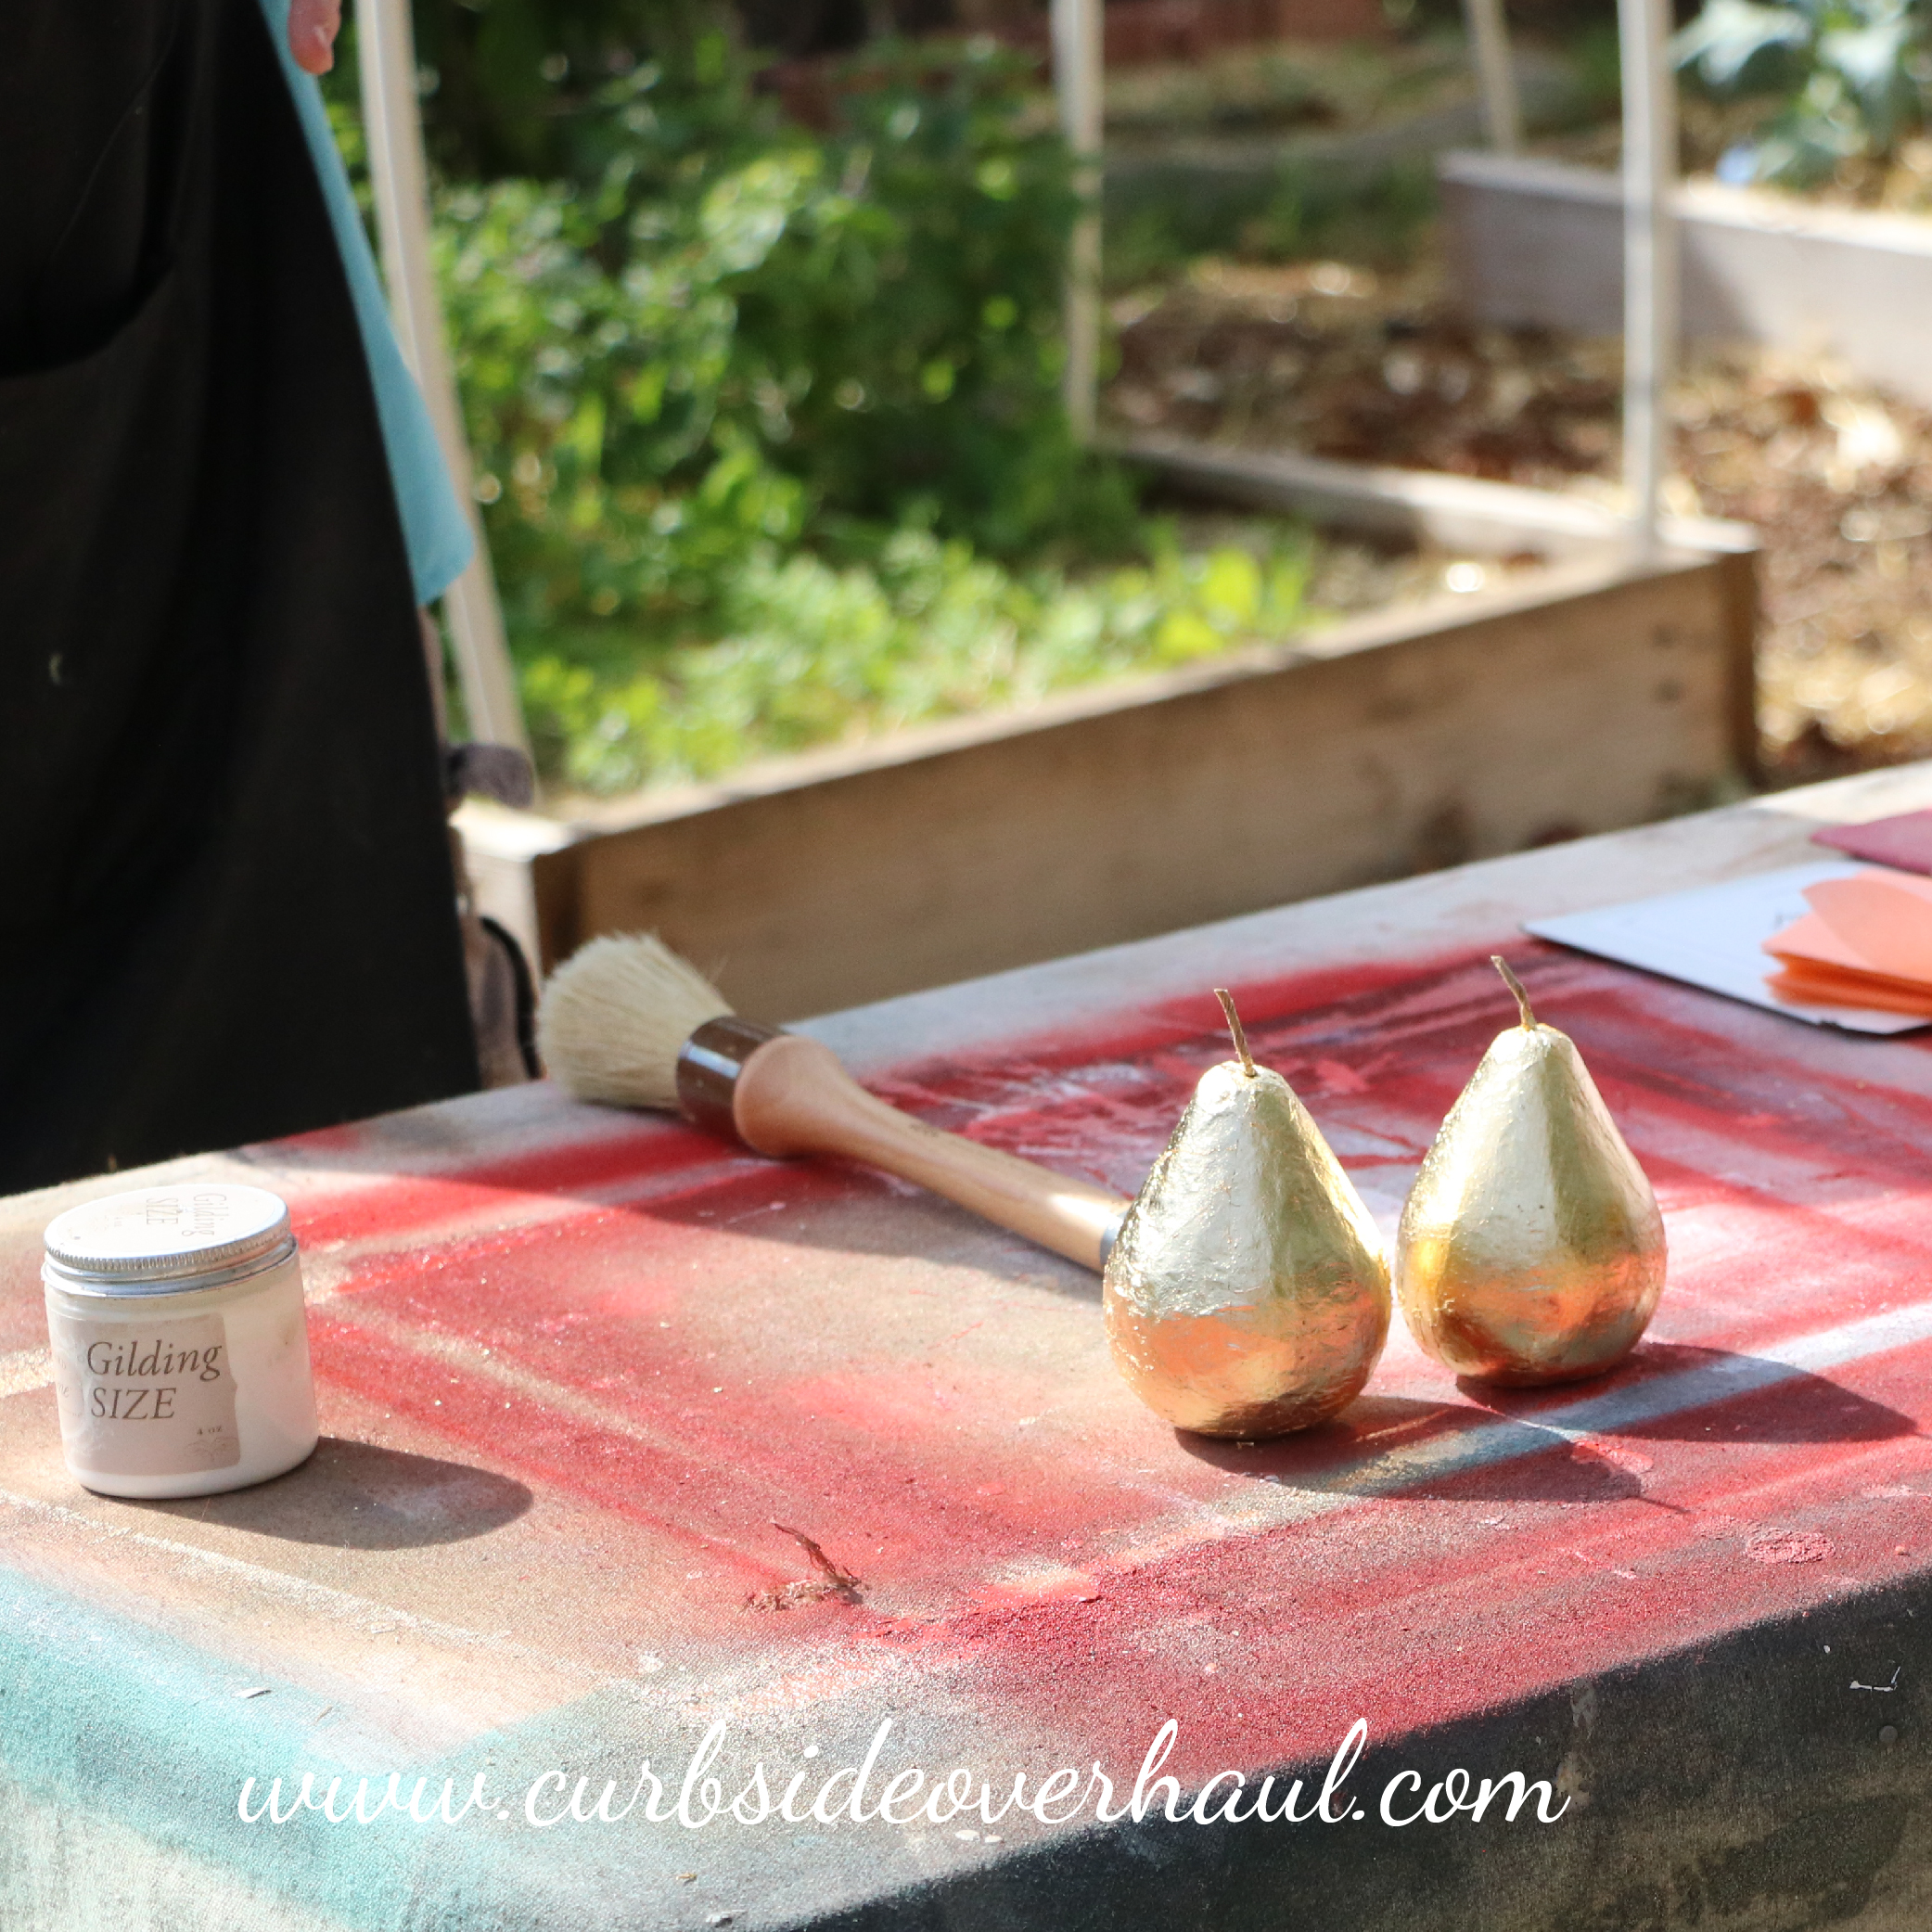
Our next project are these paper mache pears covered in imitation gold leaf. You can use silver, copper or any other color to accommodate your other decorations. You can use them as ornaments, to add a pop of color to greenery, or make a wreath with them. This tutorial shows you basics on how to make them, but we leave the rest of the creative power up to you.
Paper Mache Pears
Materials Needed:
Paper mache items
Imt. Gold Leaf
Gilding Size
Brush
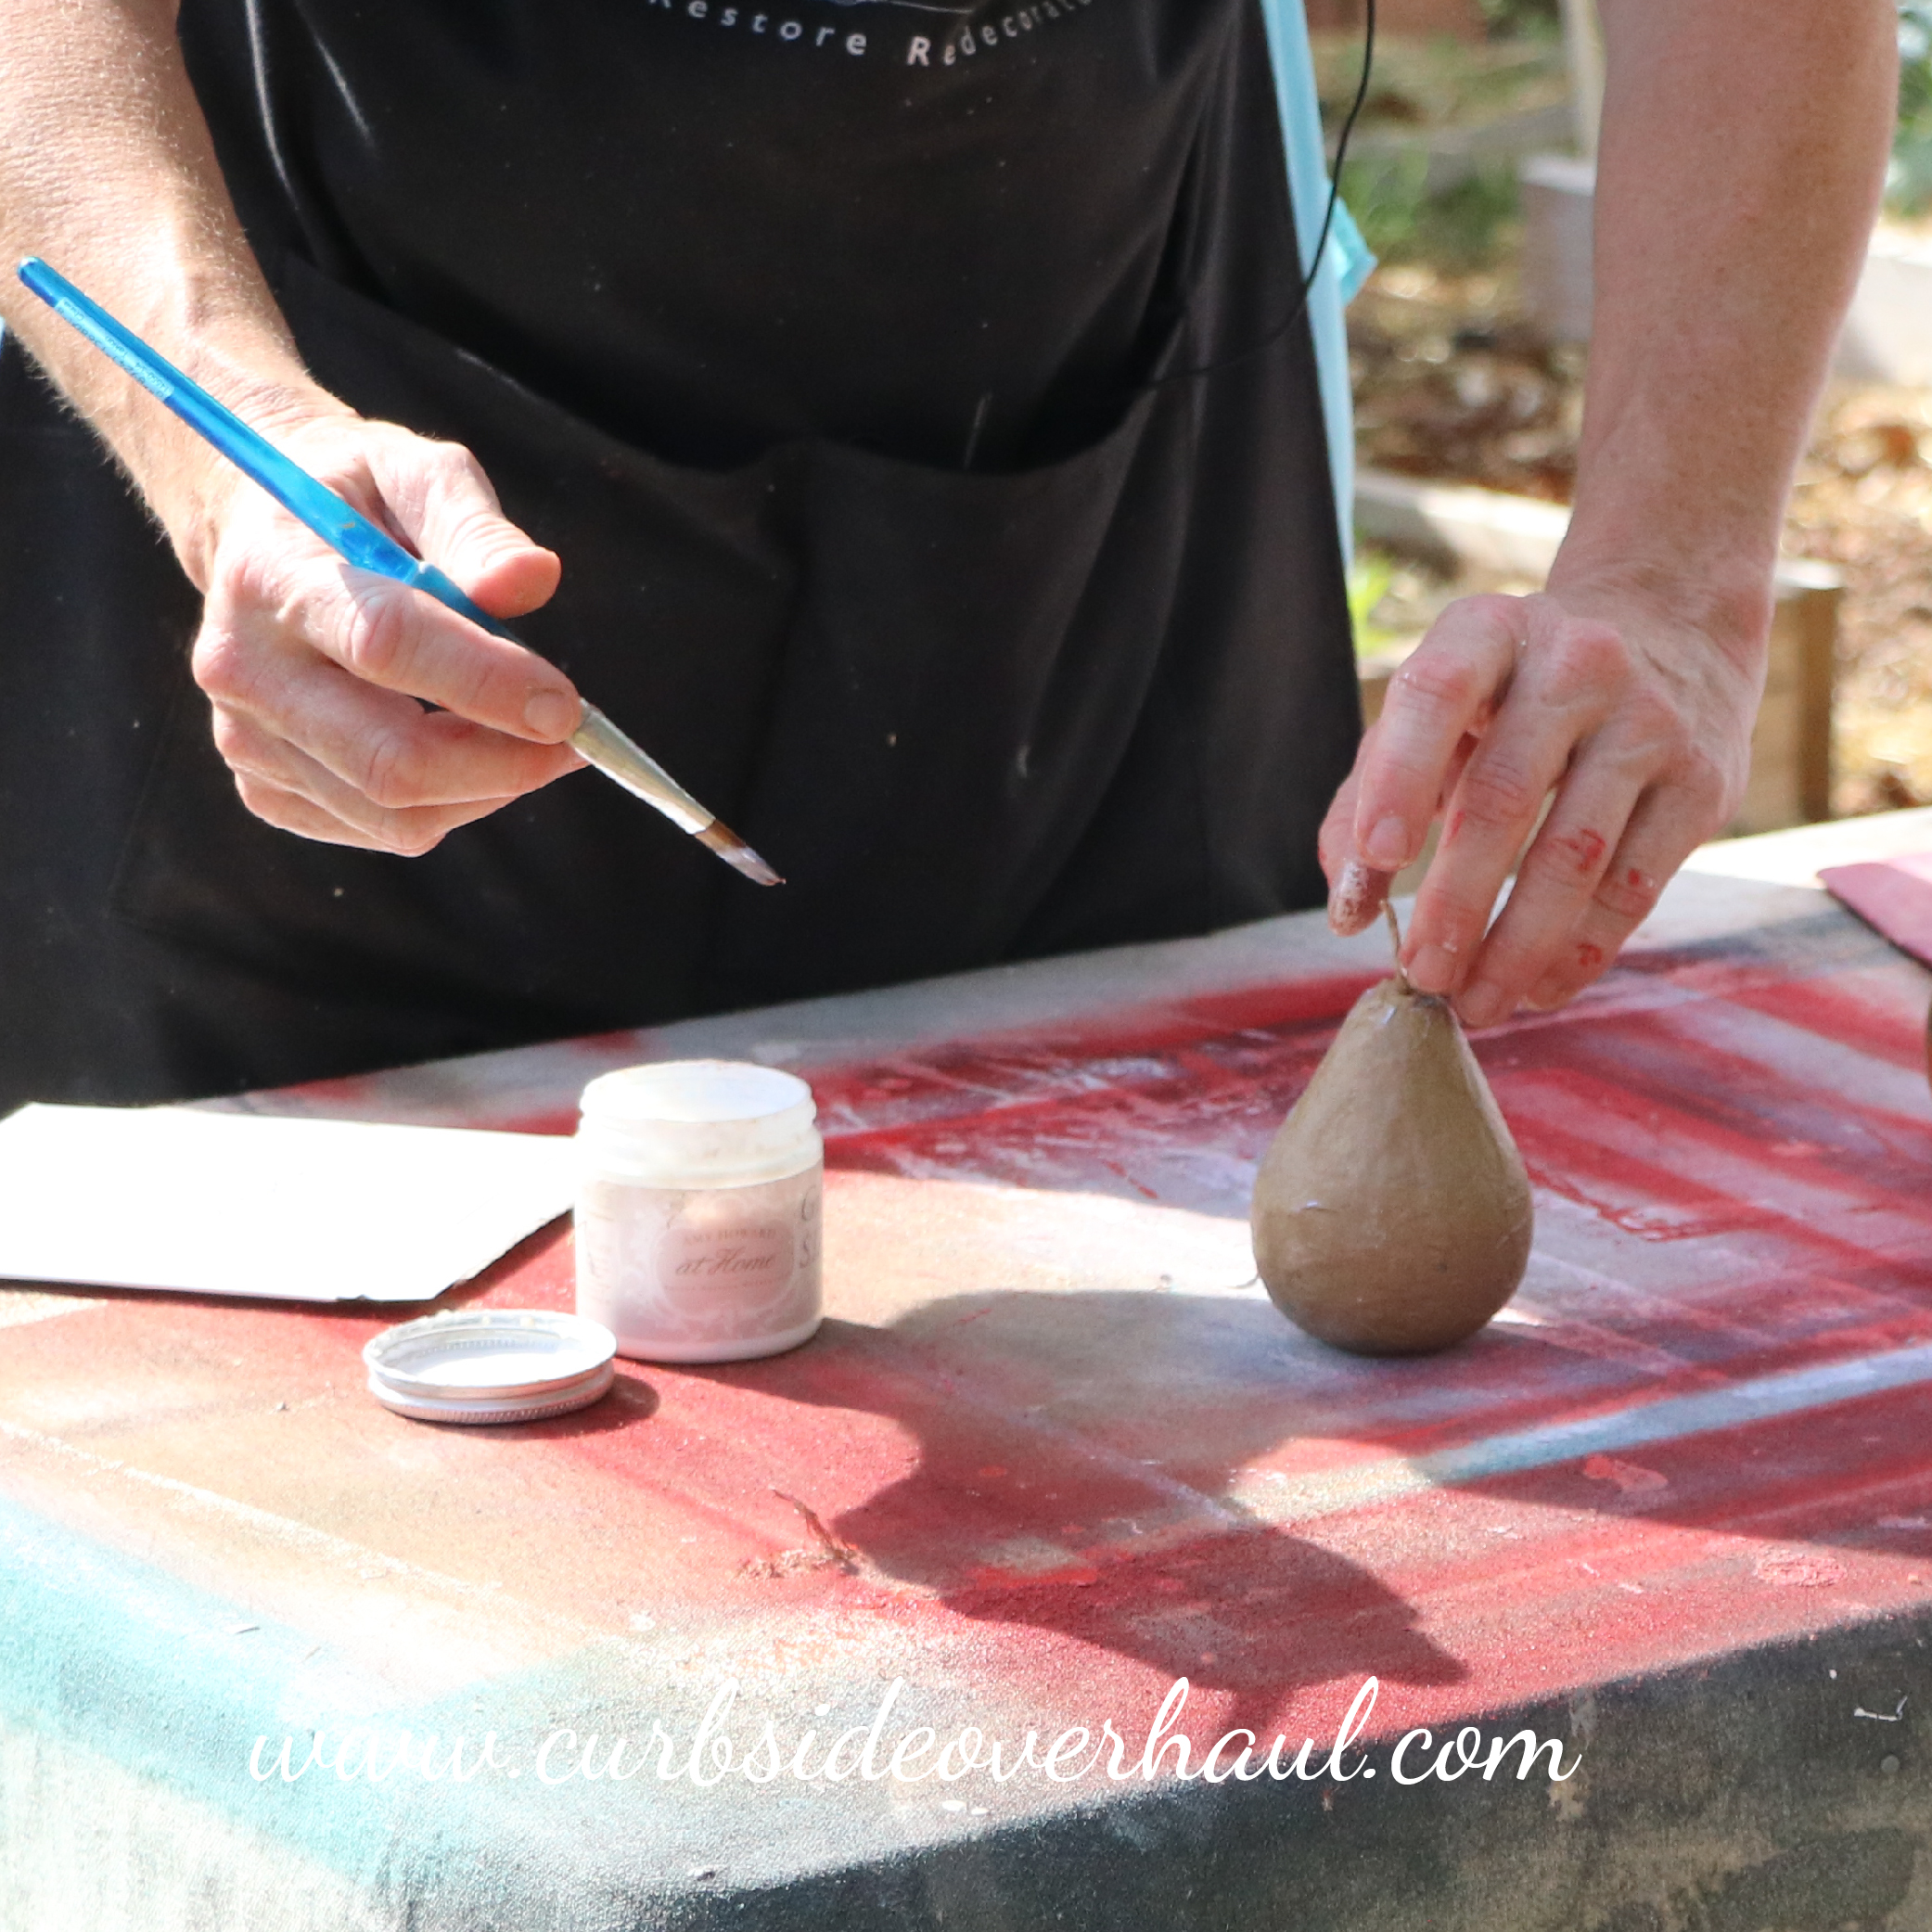
Step One: Apply Gilding Size
Cover the pear or other paper mache item in gilding size. If there are any areas you don’t want covered, then make sure you don’t get the gilding size on that area.
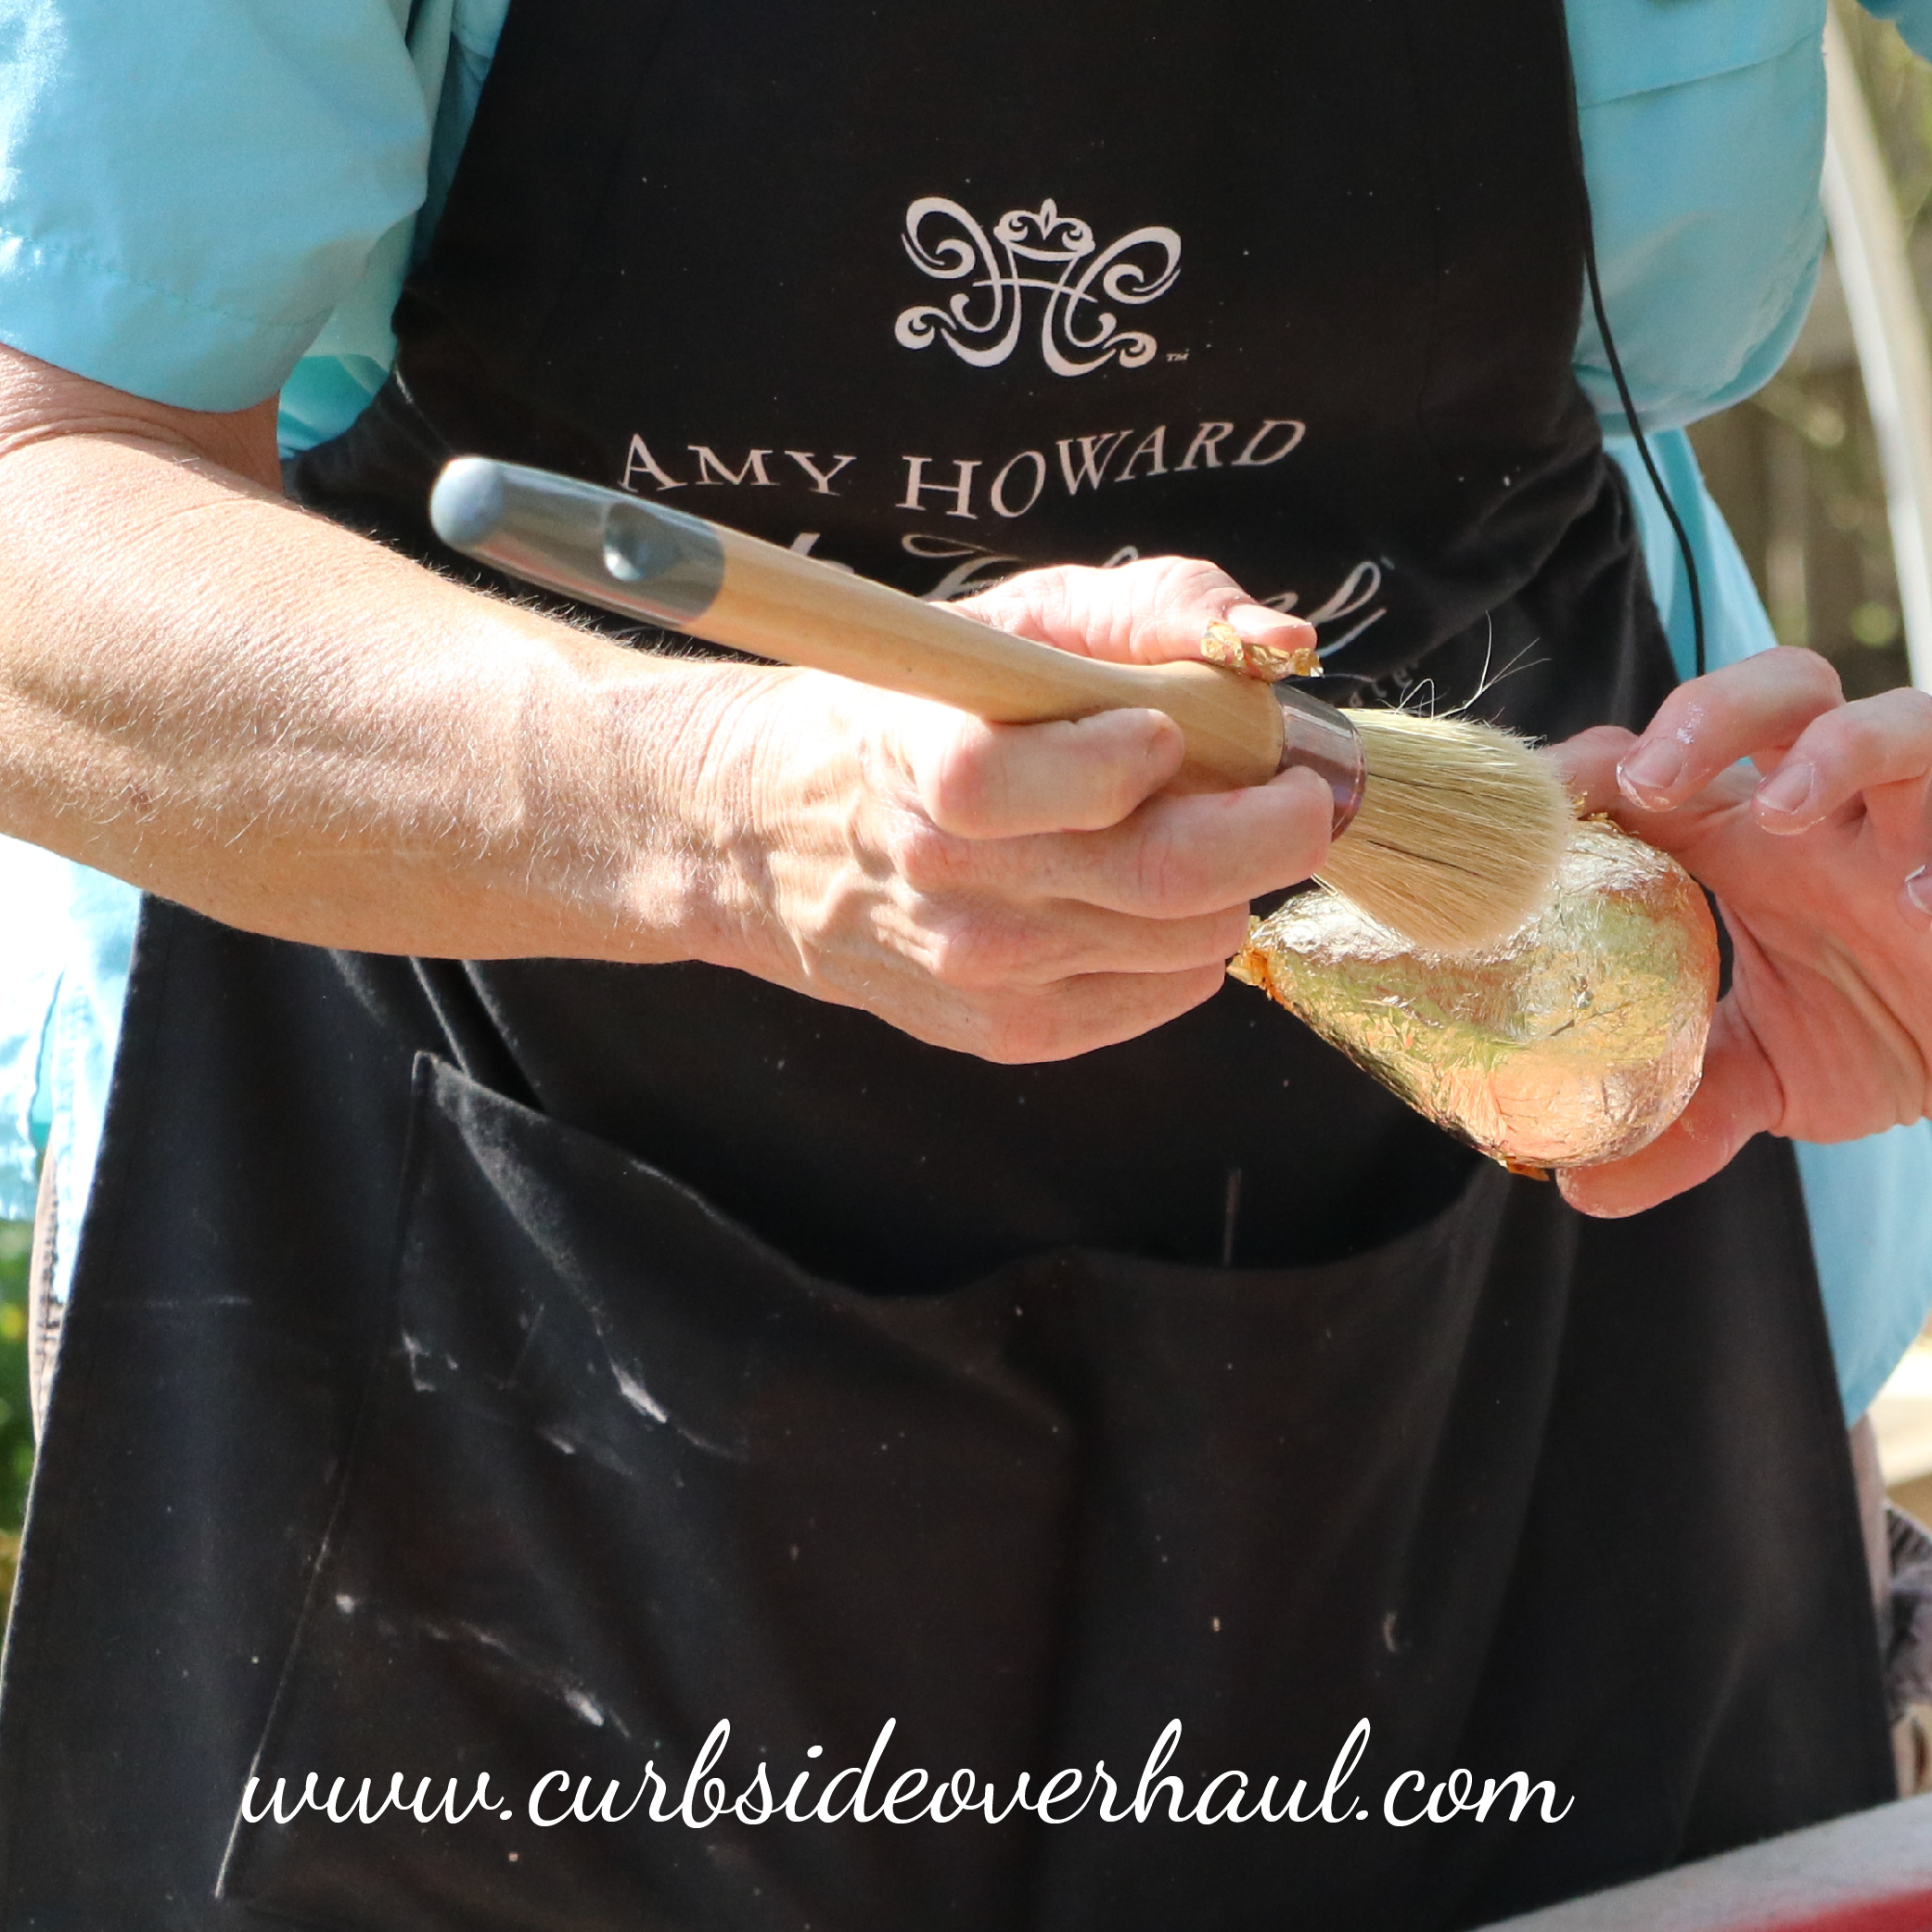
Step Two: Apply Imt. Gold Leaf
Once the gilding size has dried clear, peel back a page to expose the gold leaf. Roll the pear across the gold leaf. Keep going until the pear is covered.
Step Three: Brush
Once the pear is cover with the leaf, take a brush and lightly brush off the excess flakes.
And there you have a simple, inexpensive decoration to add a pop of color to your greenery, use as a decoration or to turn into an ornament and gift to someone else.
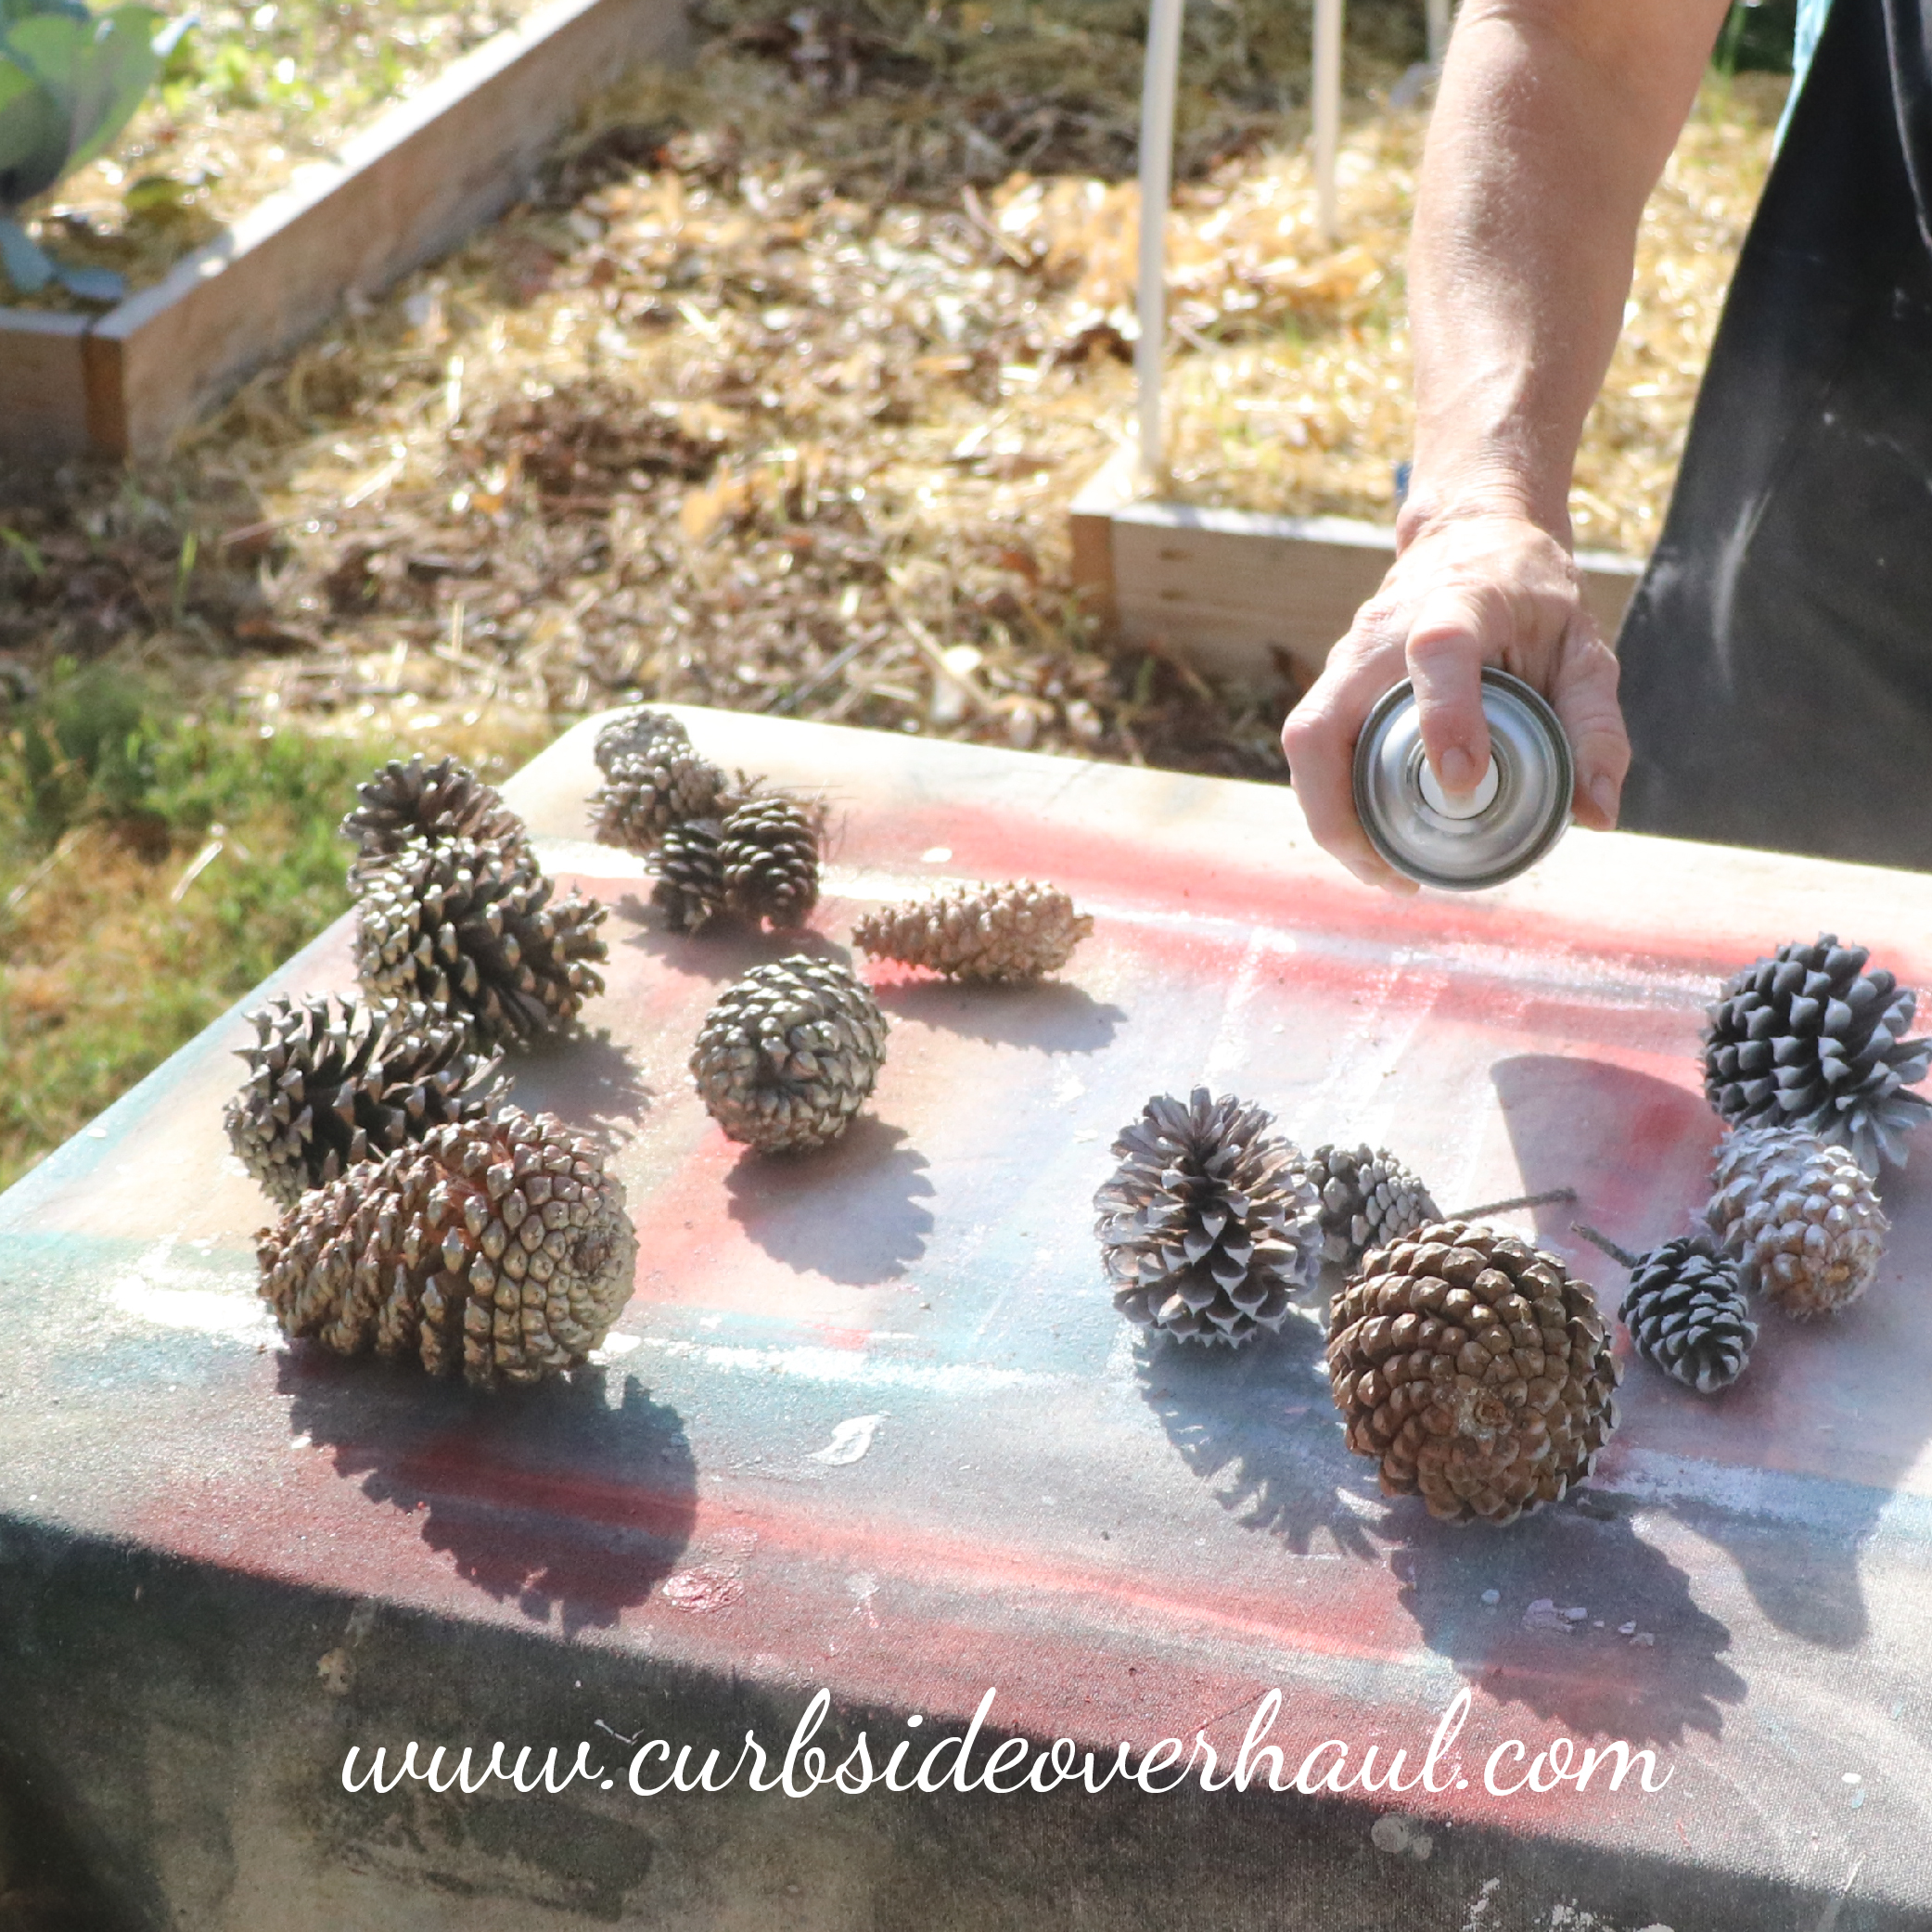
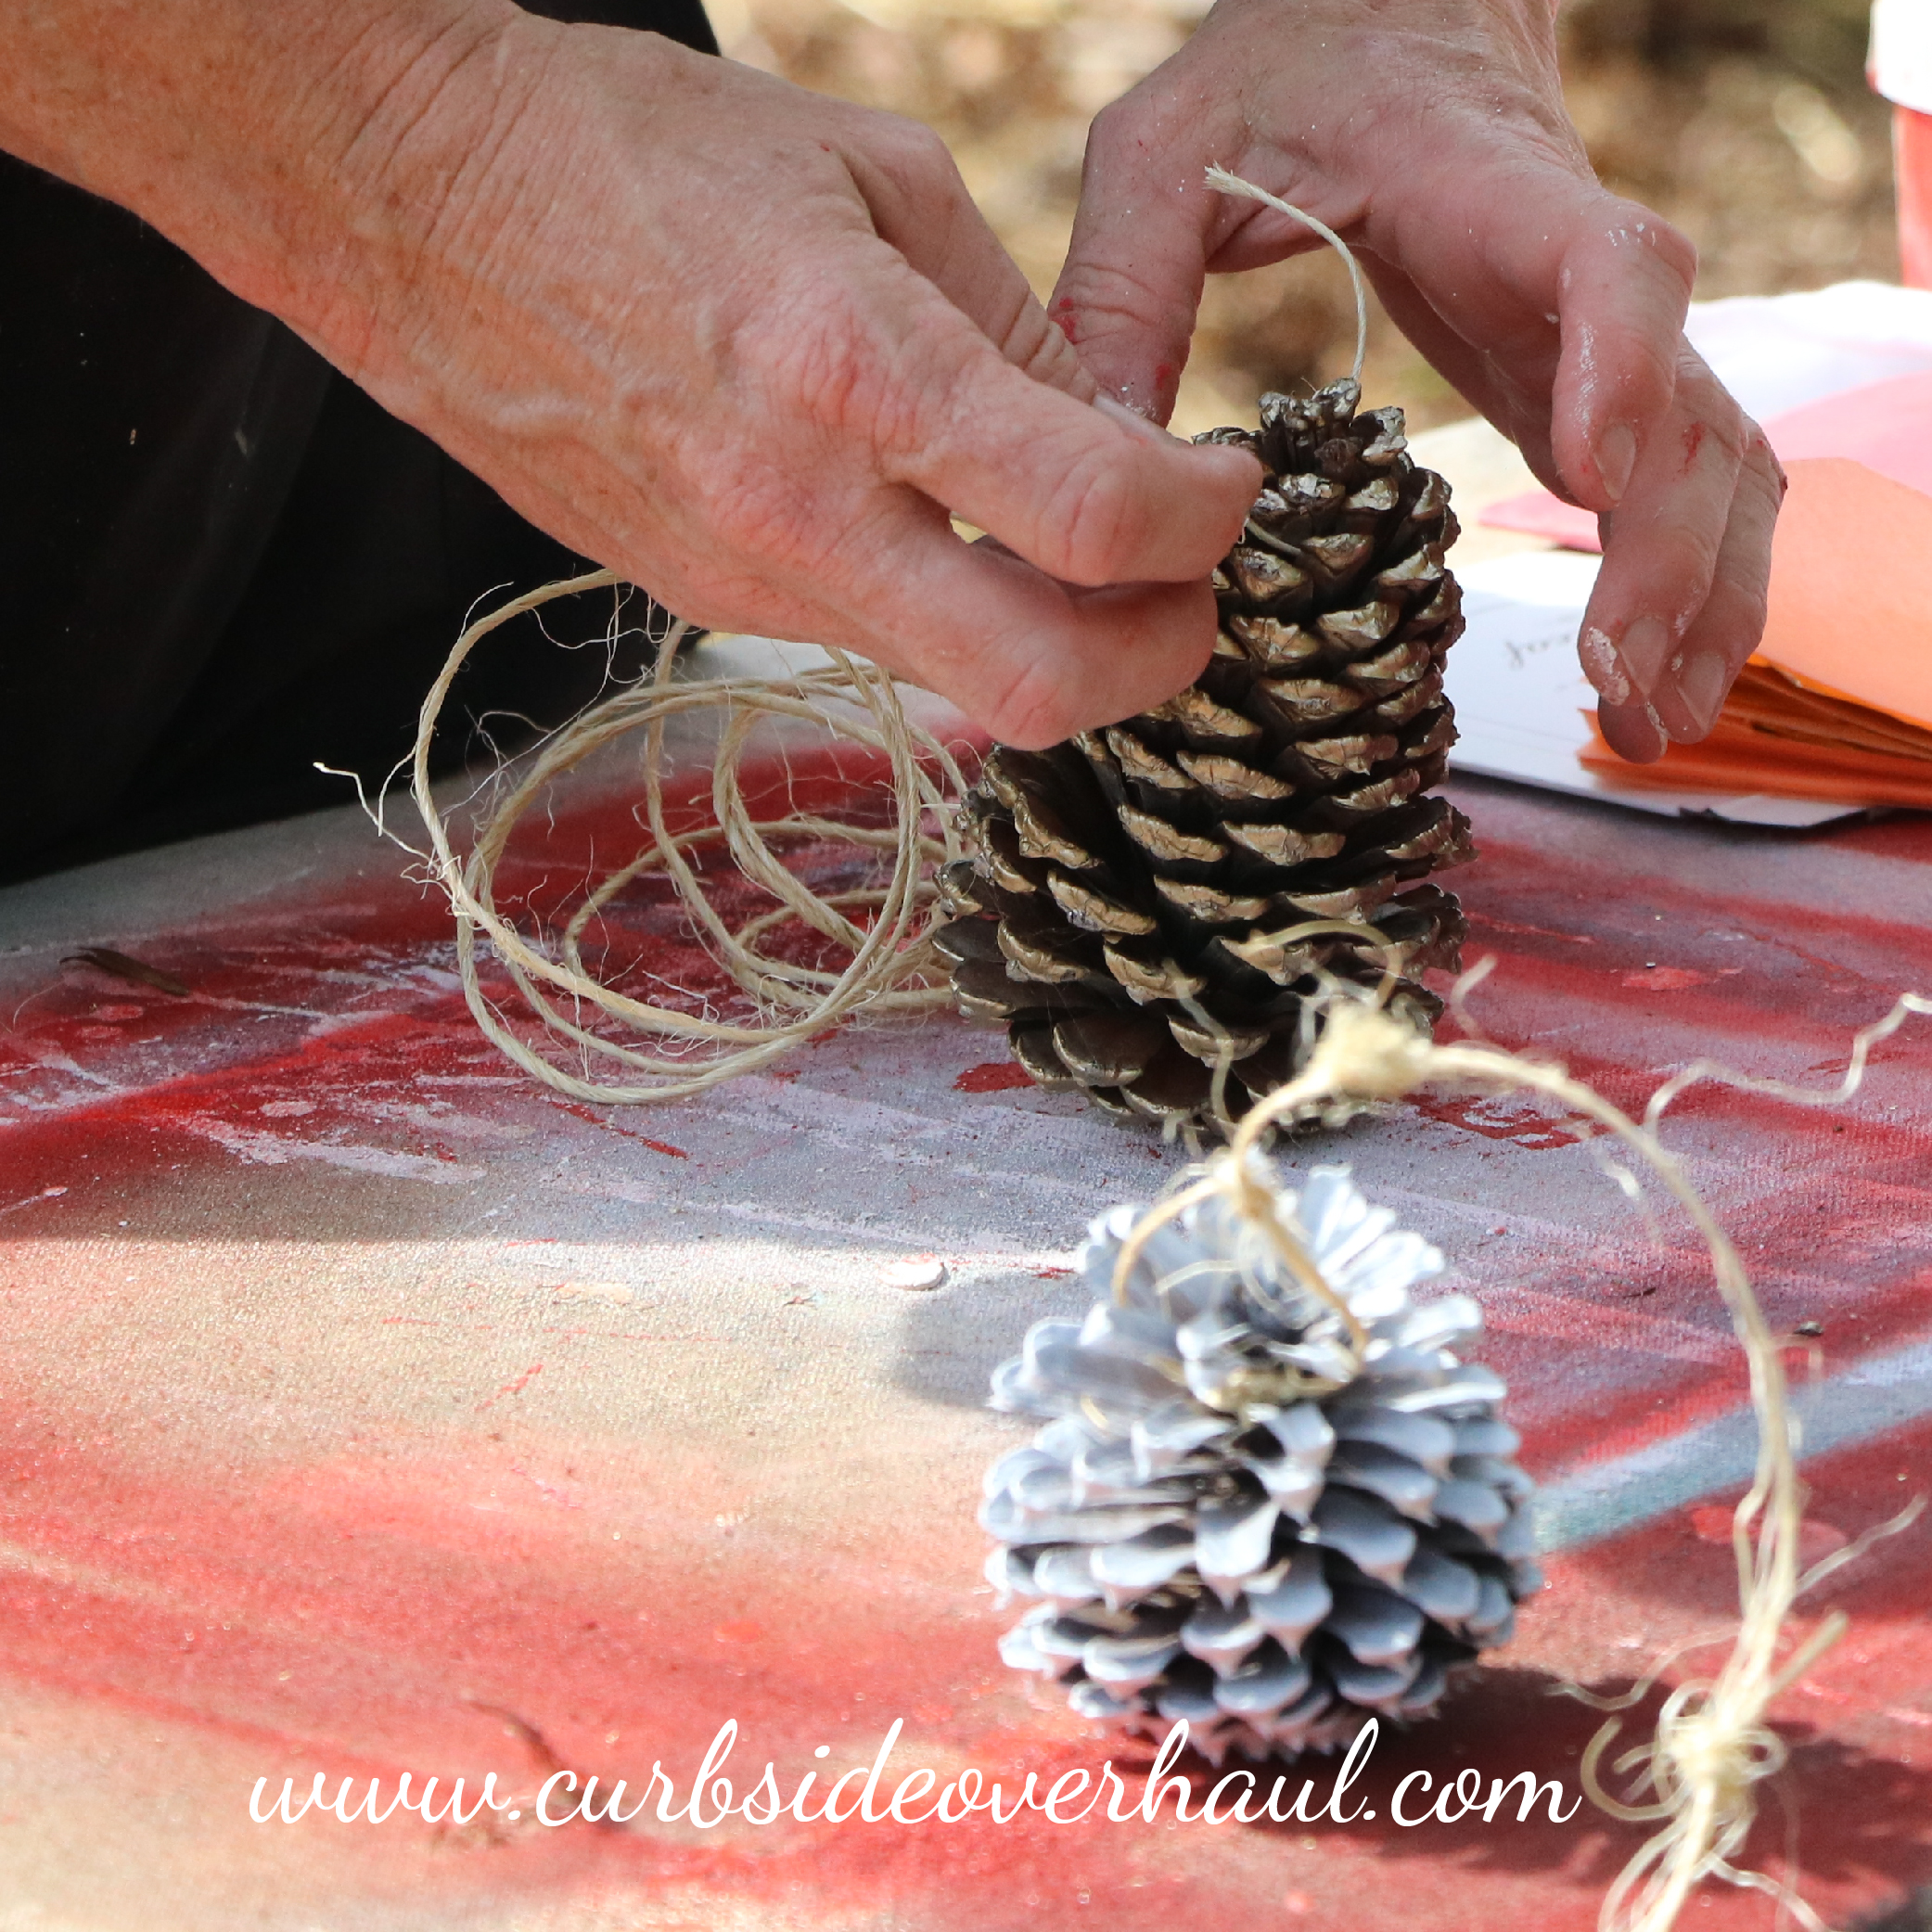
Pine Cone Ornaments
Materials Needed:
Pine cones or other natural materials
Spray Lacquer (White Perfection and Golden Egg)
Jute String
Step One: Spray the Cones
Spray your pine cones with the spray lacquer colors you’ve chosen. We chose white and gold to go with our other Christmas decorations. We just wanted the tips of our cones colored, so we didn’t spray too heavy. After the paint dries, turn the cones over and do the other sides.
Step Two: Use to Decorate
There is no end to the amount of ways you can use these decorations. You can tie some twine around the middle to use them as ornaments, fill a bowl or a clear vase, or even scatter them on the table. it’s up to you and your personal taste, but it’s a great way to add a rustic feel to your modern decor or to bring the outside in. Enjoy!
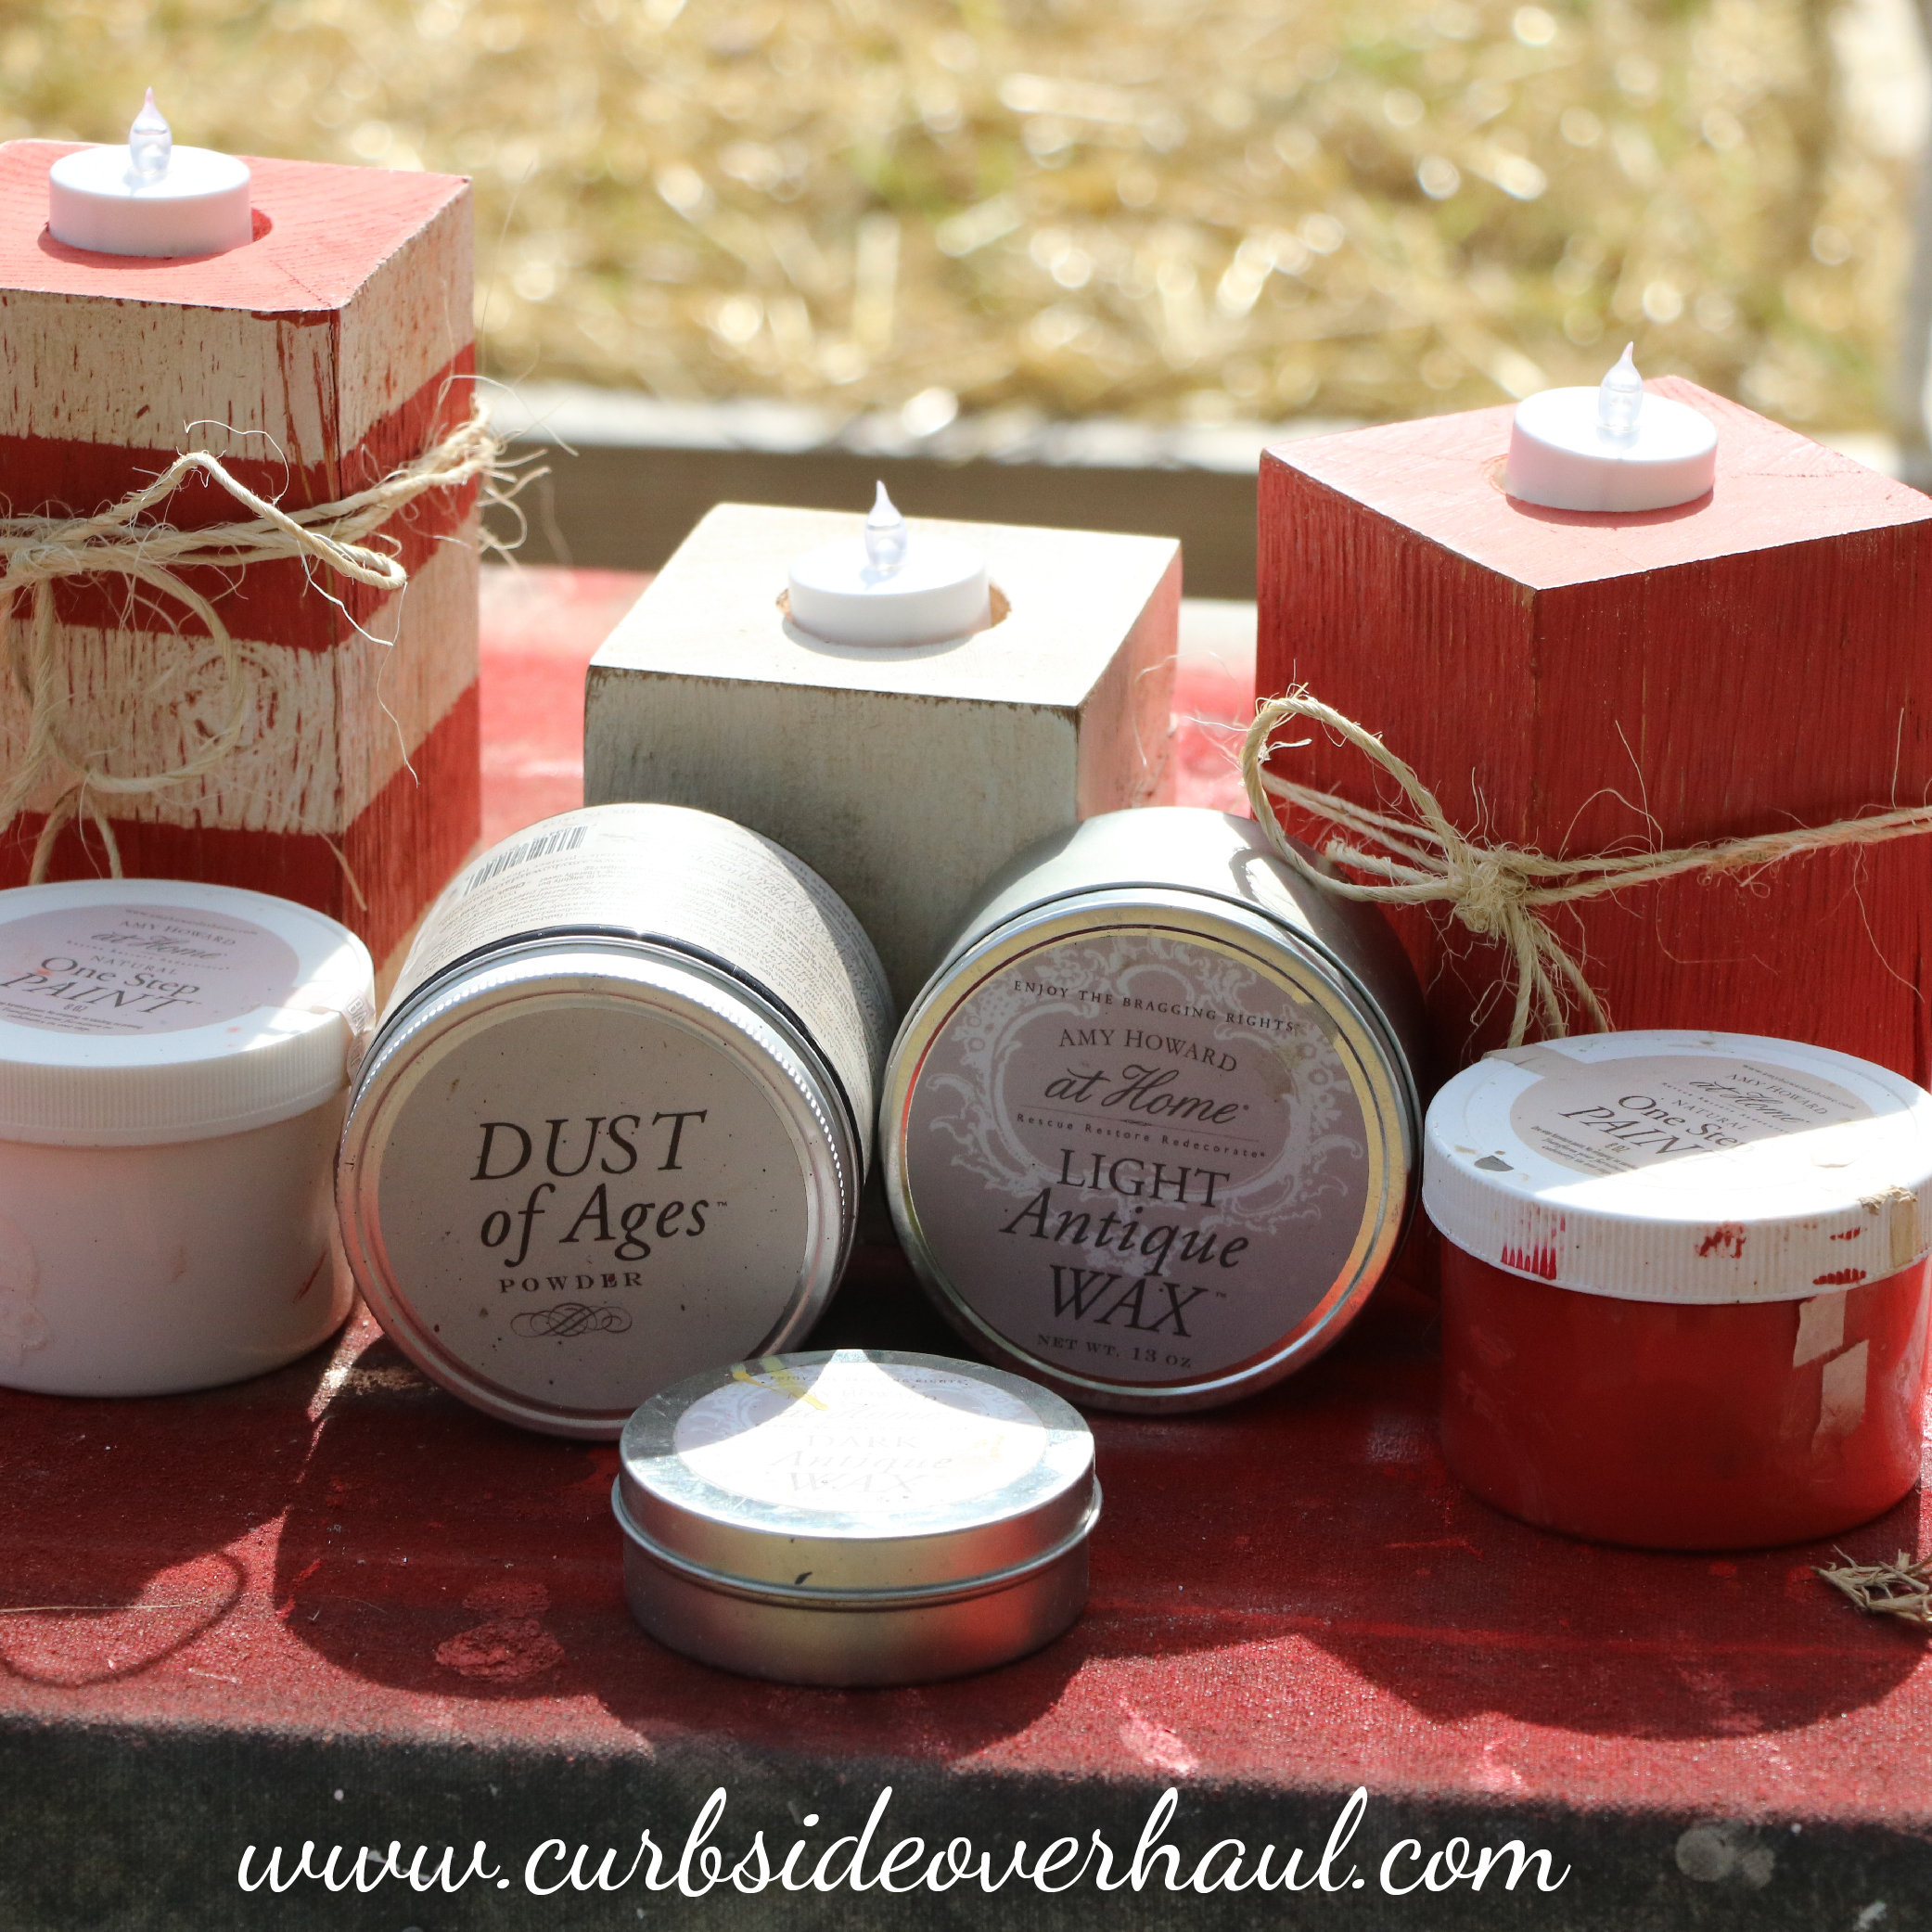
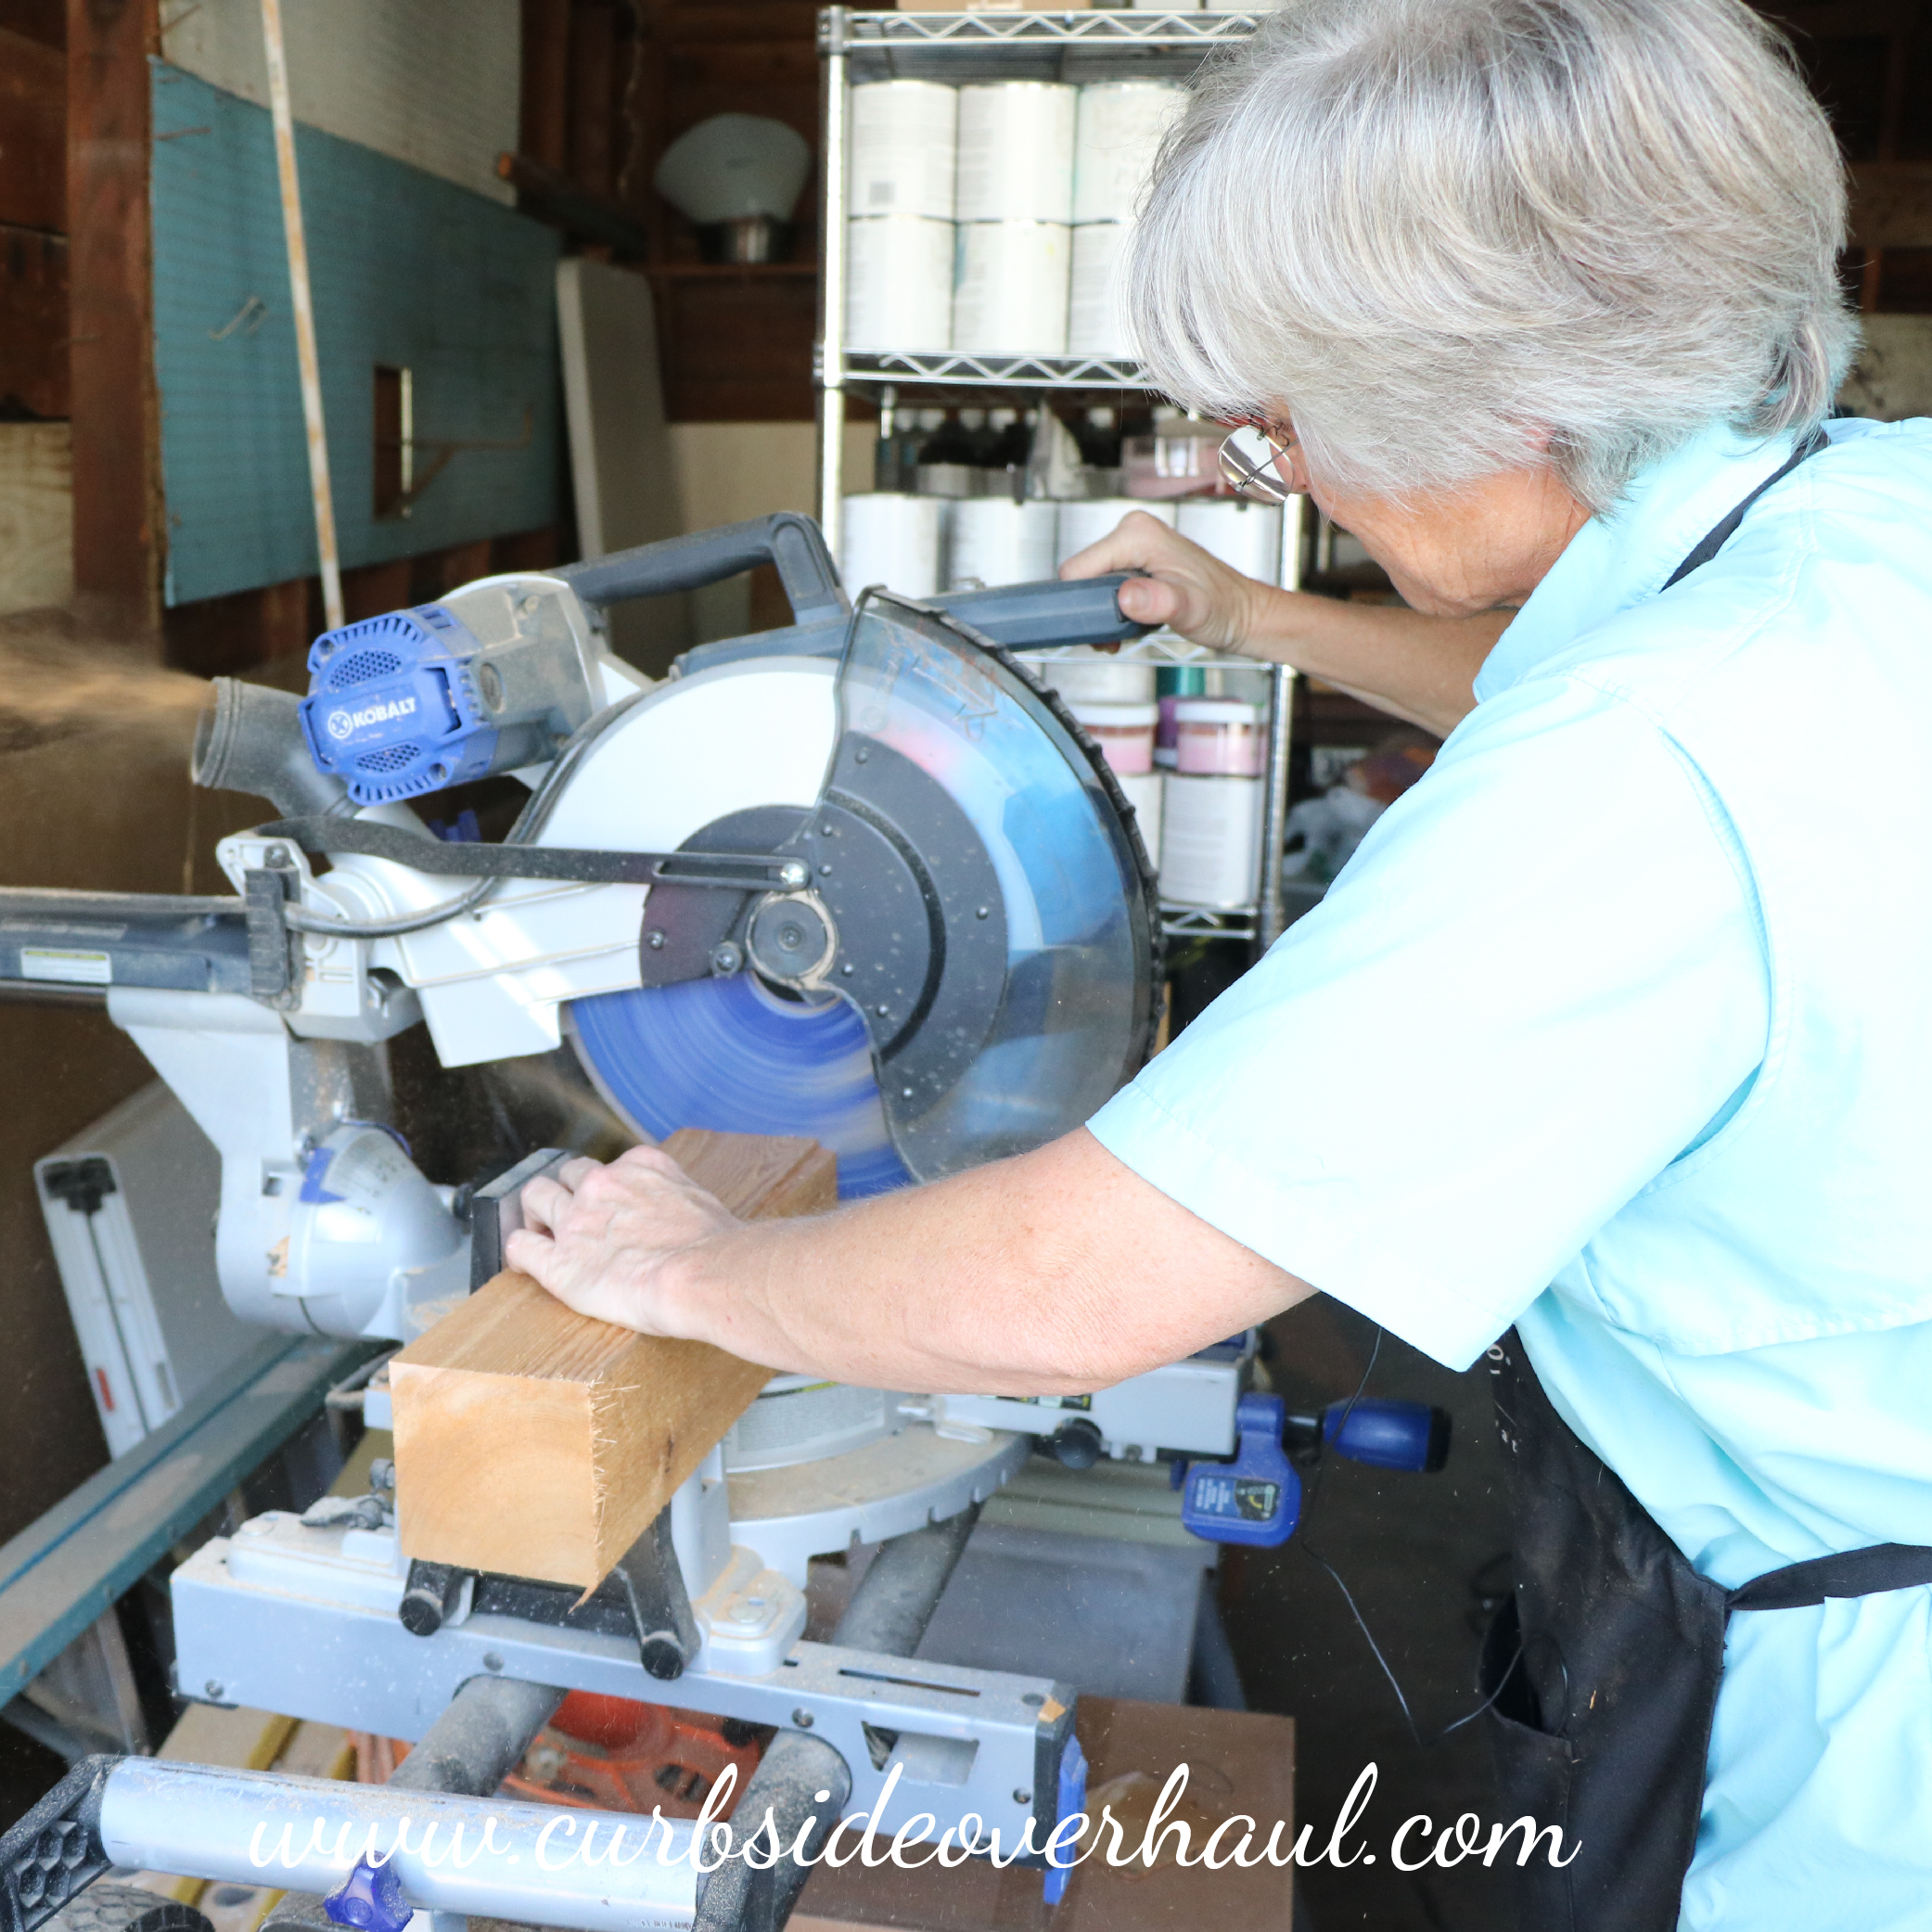
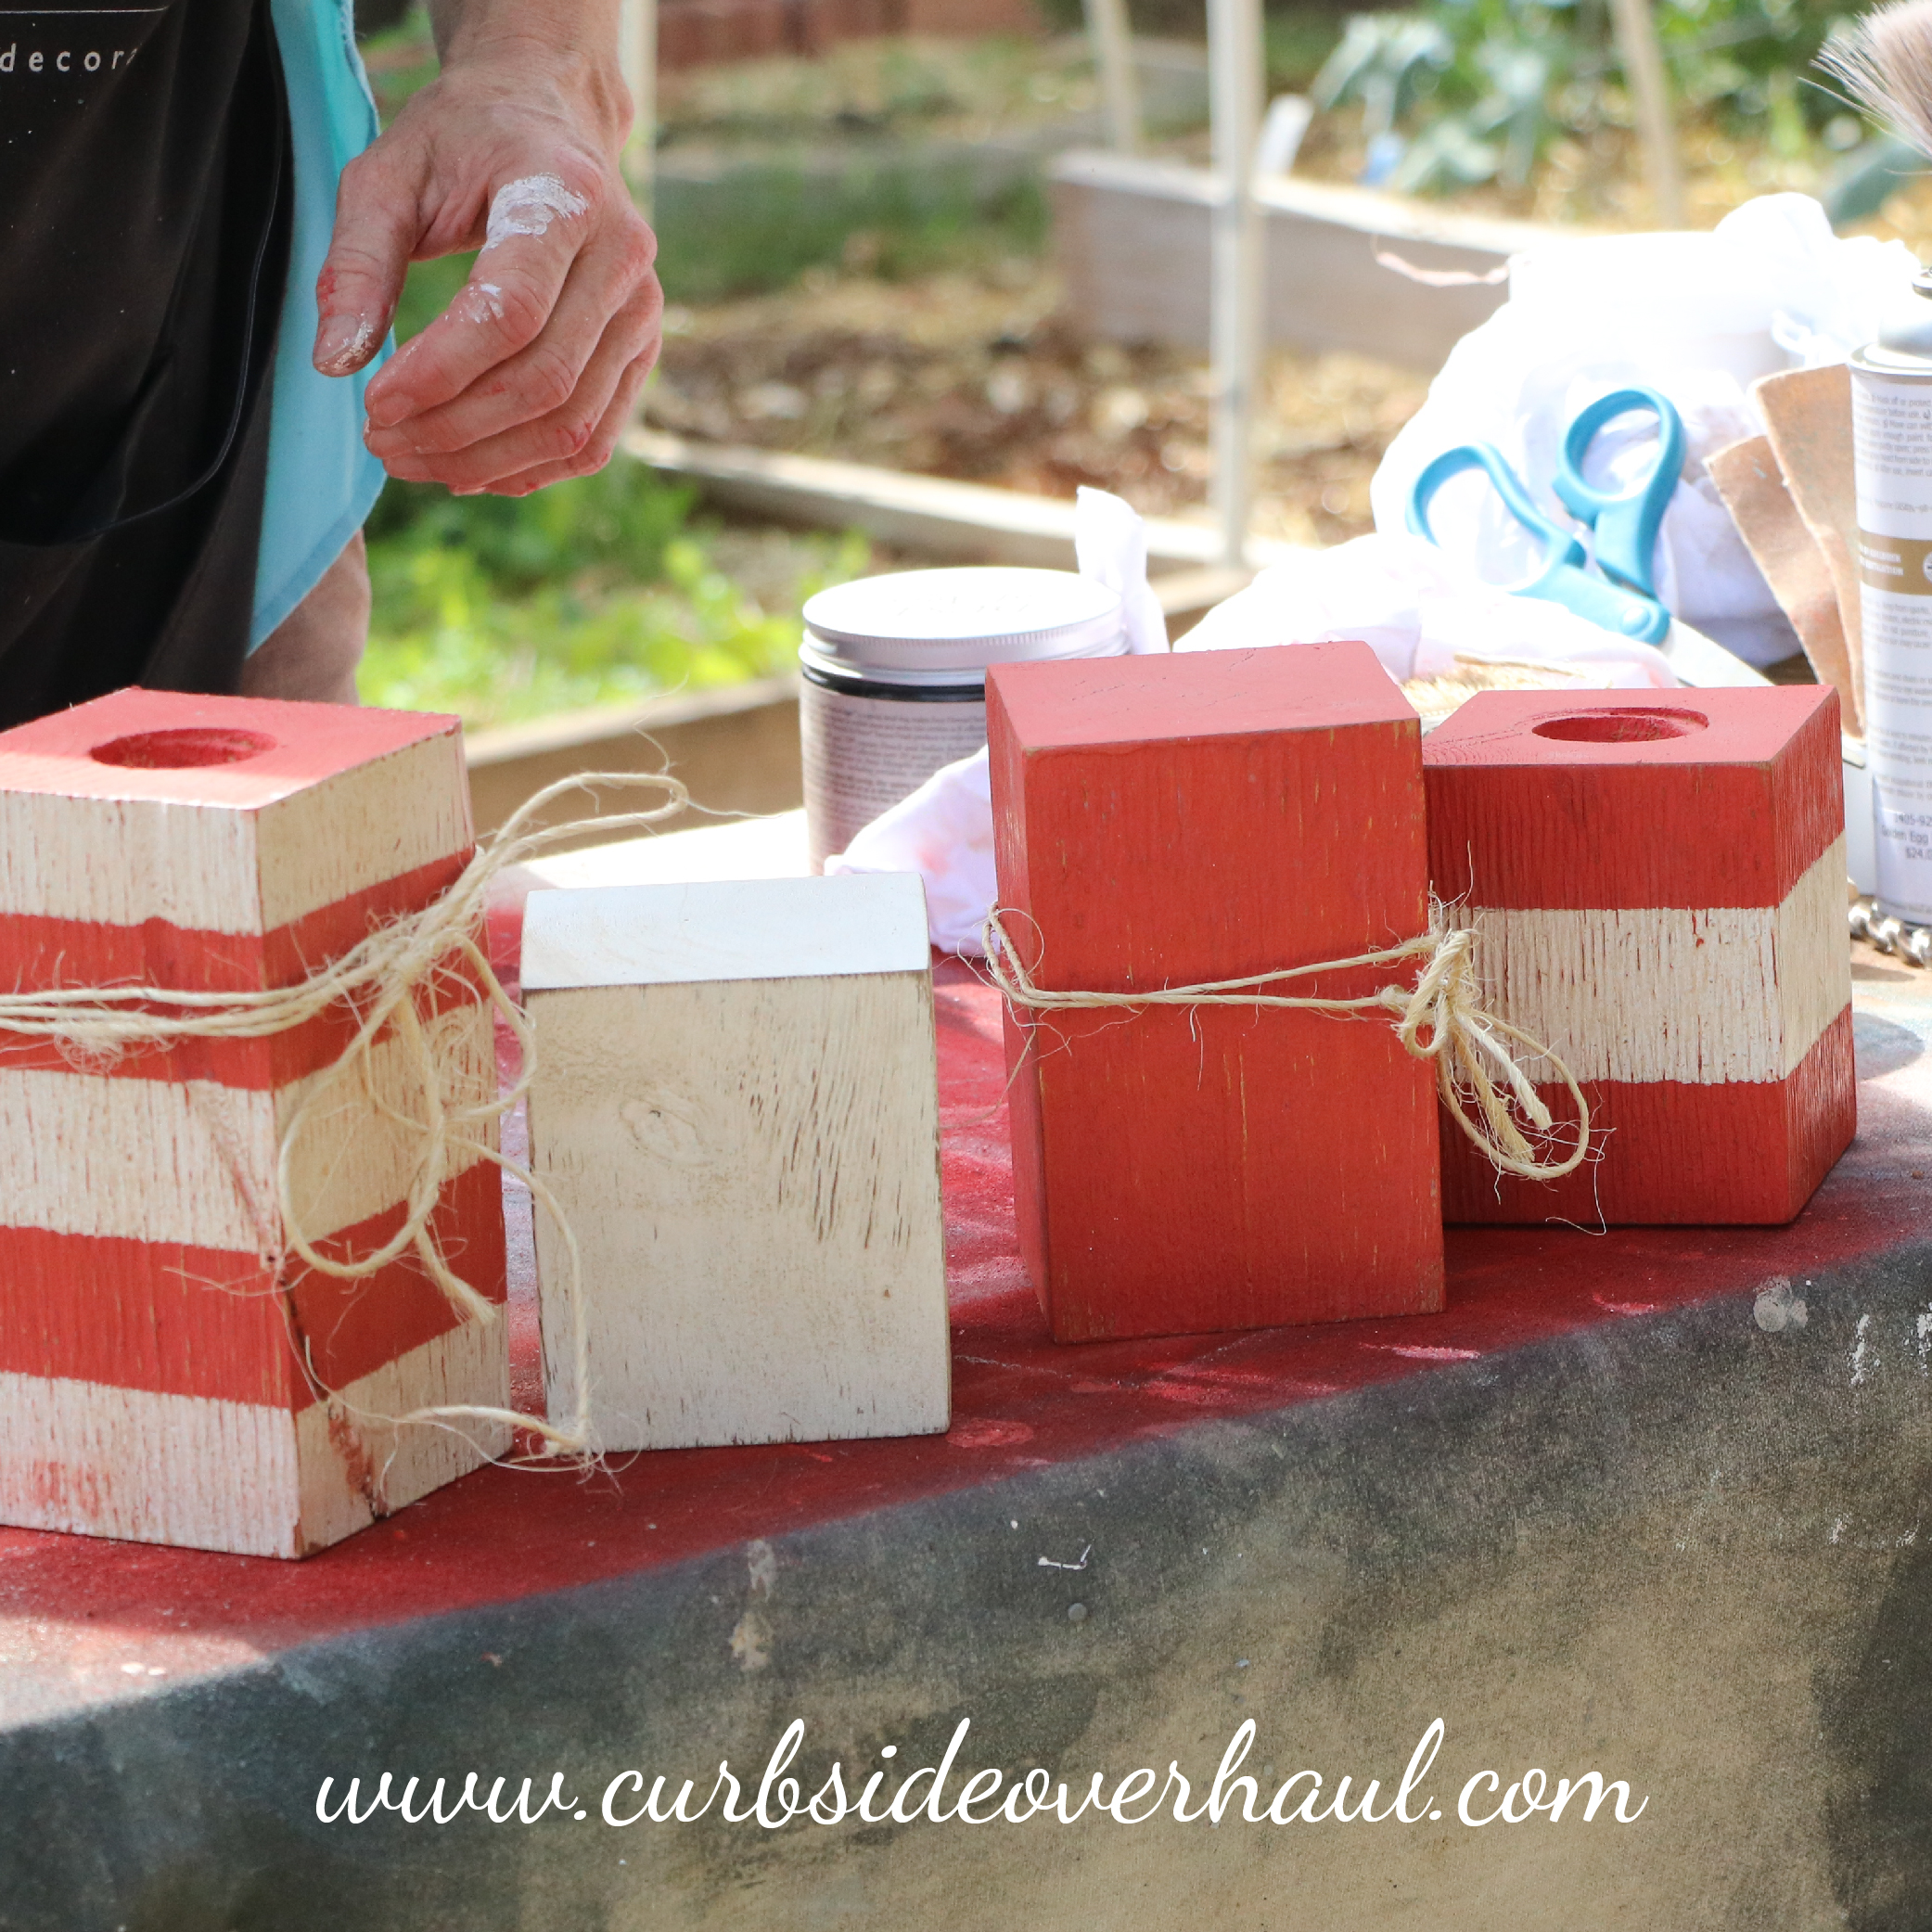
Repurposed Wood Candle Sticks
Materials Needed
Various lengths of 4 x 4s
Chalk-based paint (Chinese Red and Ballet White)
Electric Candles
Dust of Ages
Light and Dark Wax
Twine
Step One: Cut Your Candle Sticks
Cut your 4 x 4 blocks, so they are flat on both ends. How short or long you cut them is up to you, but we recommend having at least three grouped together in varying lengths.
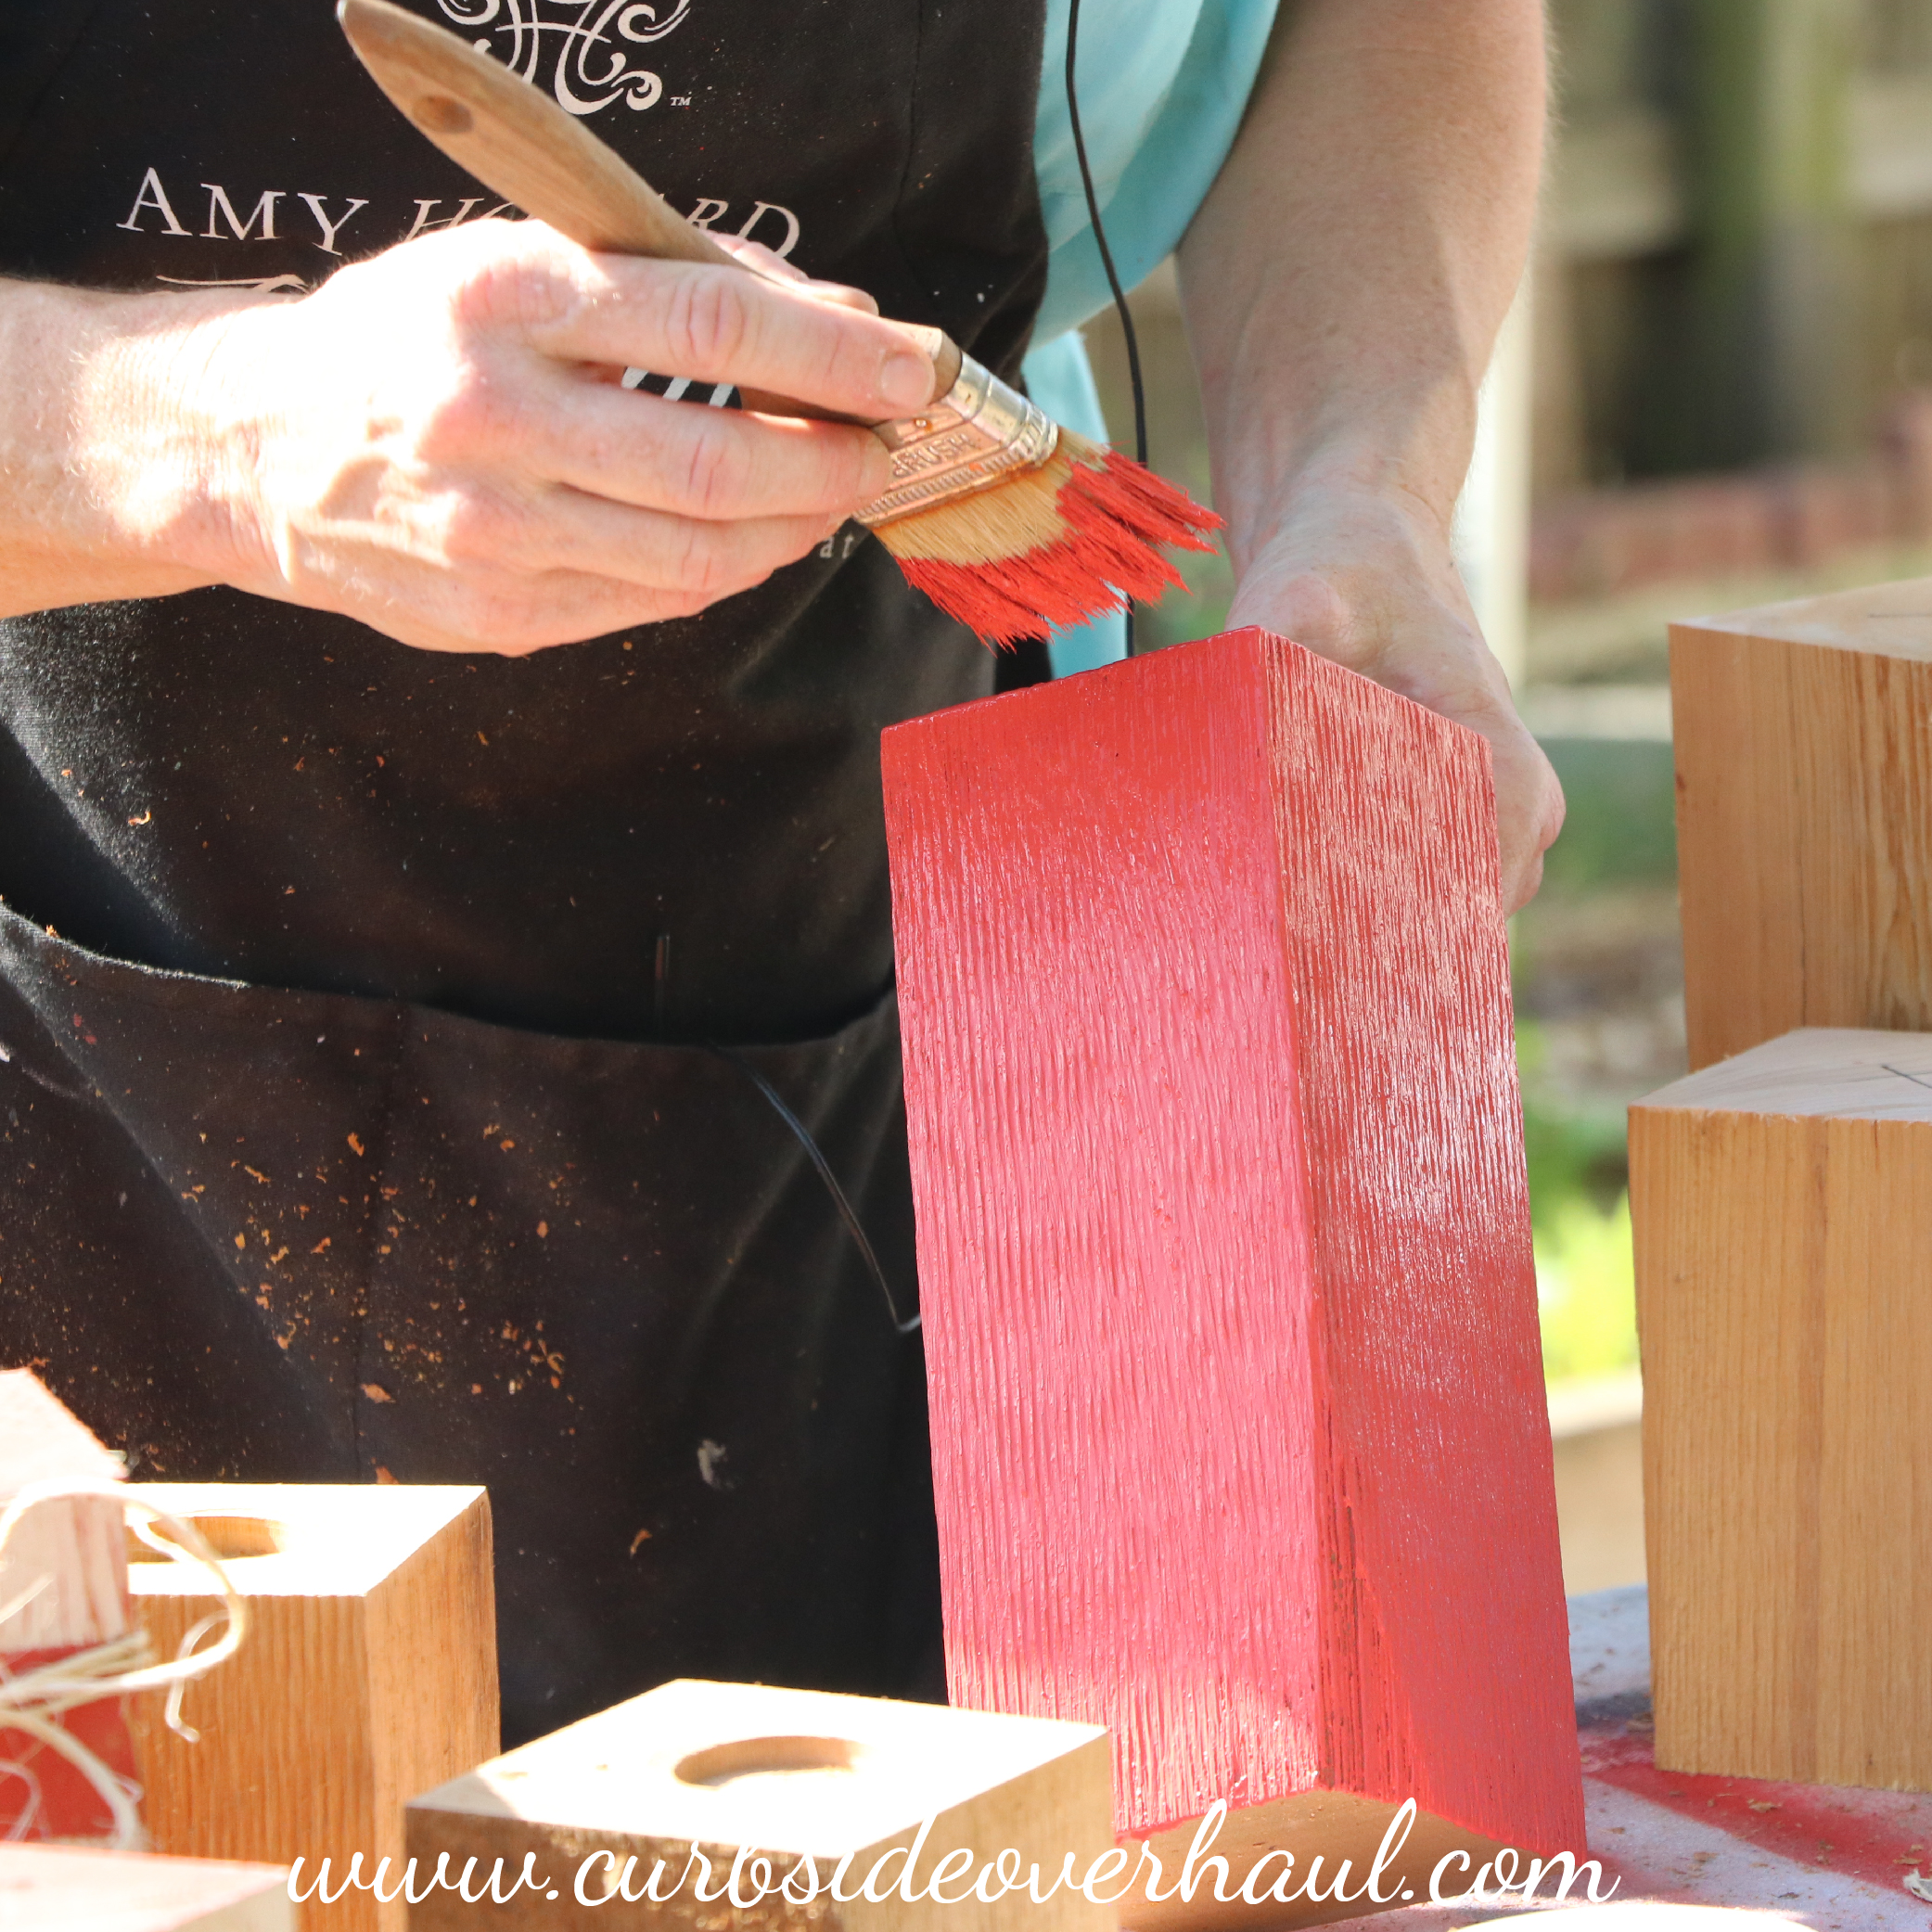
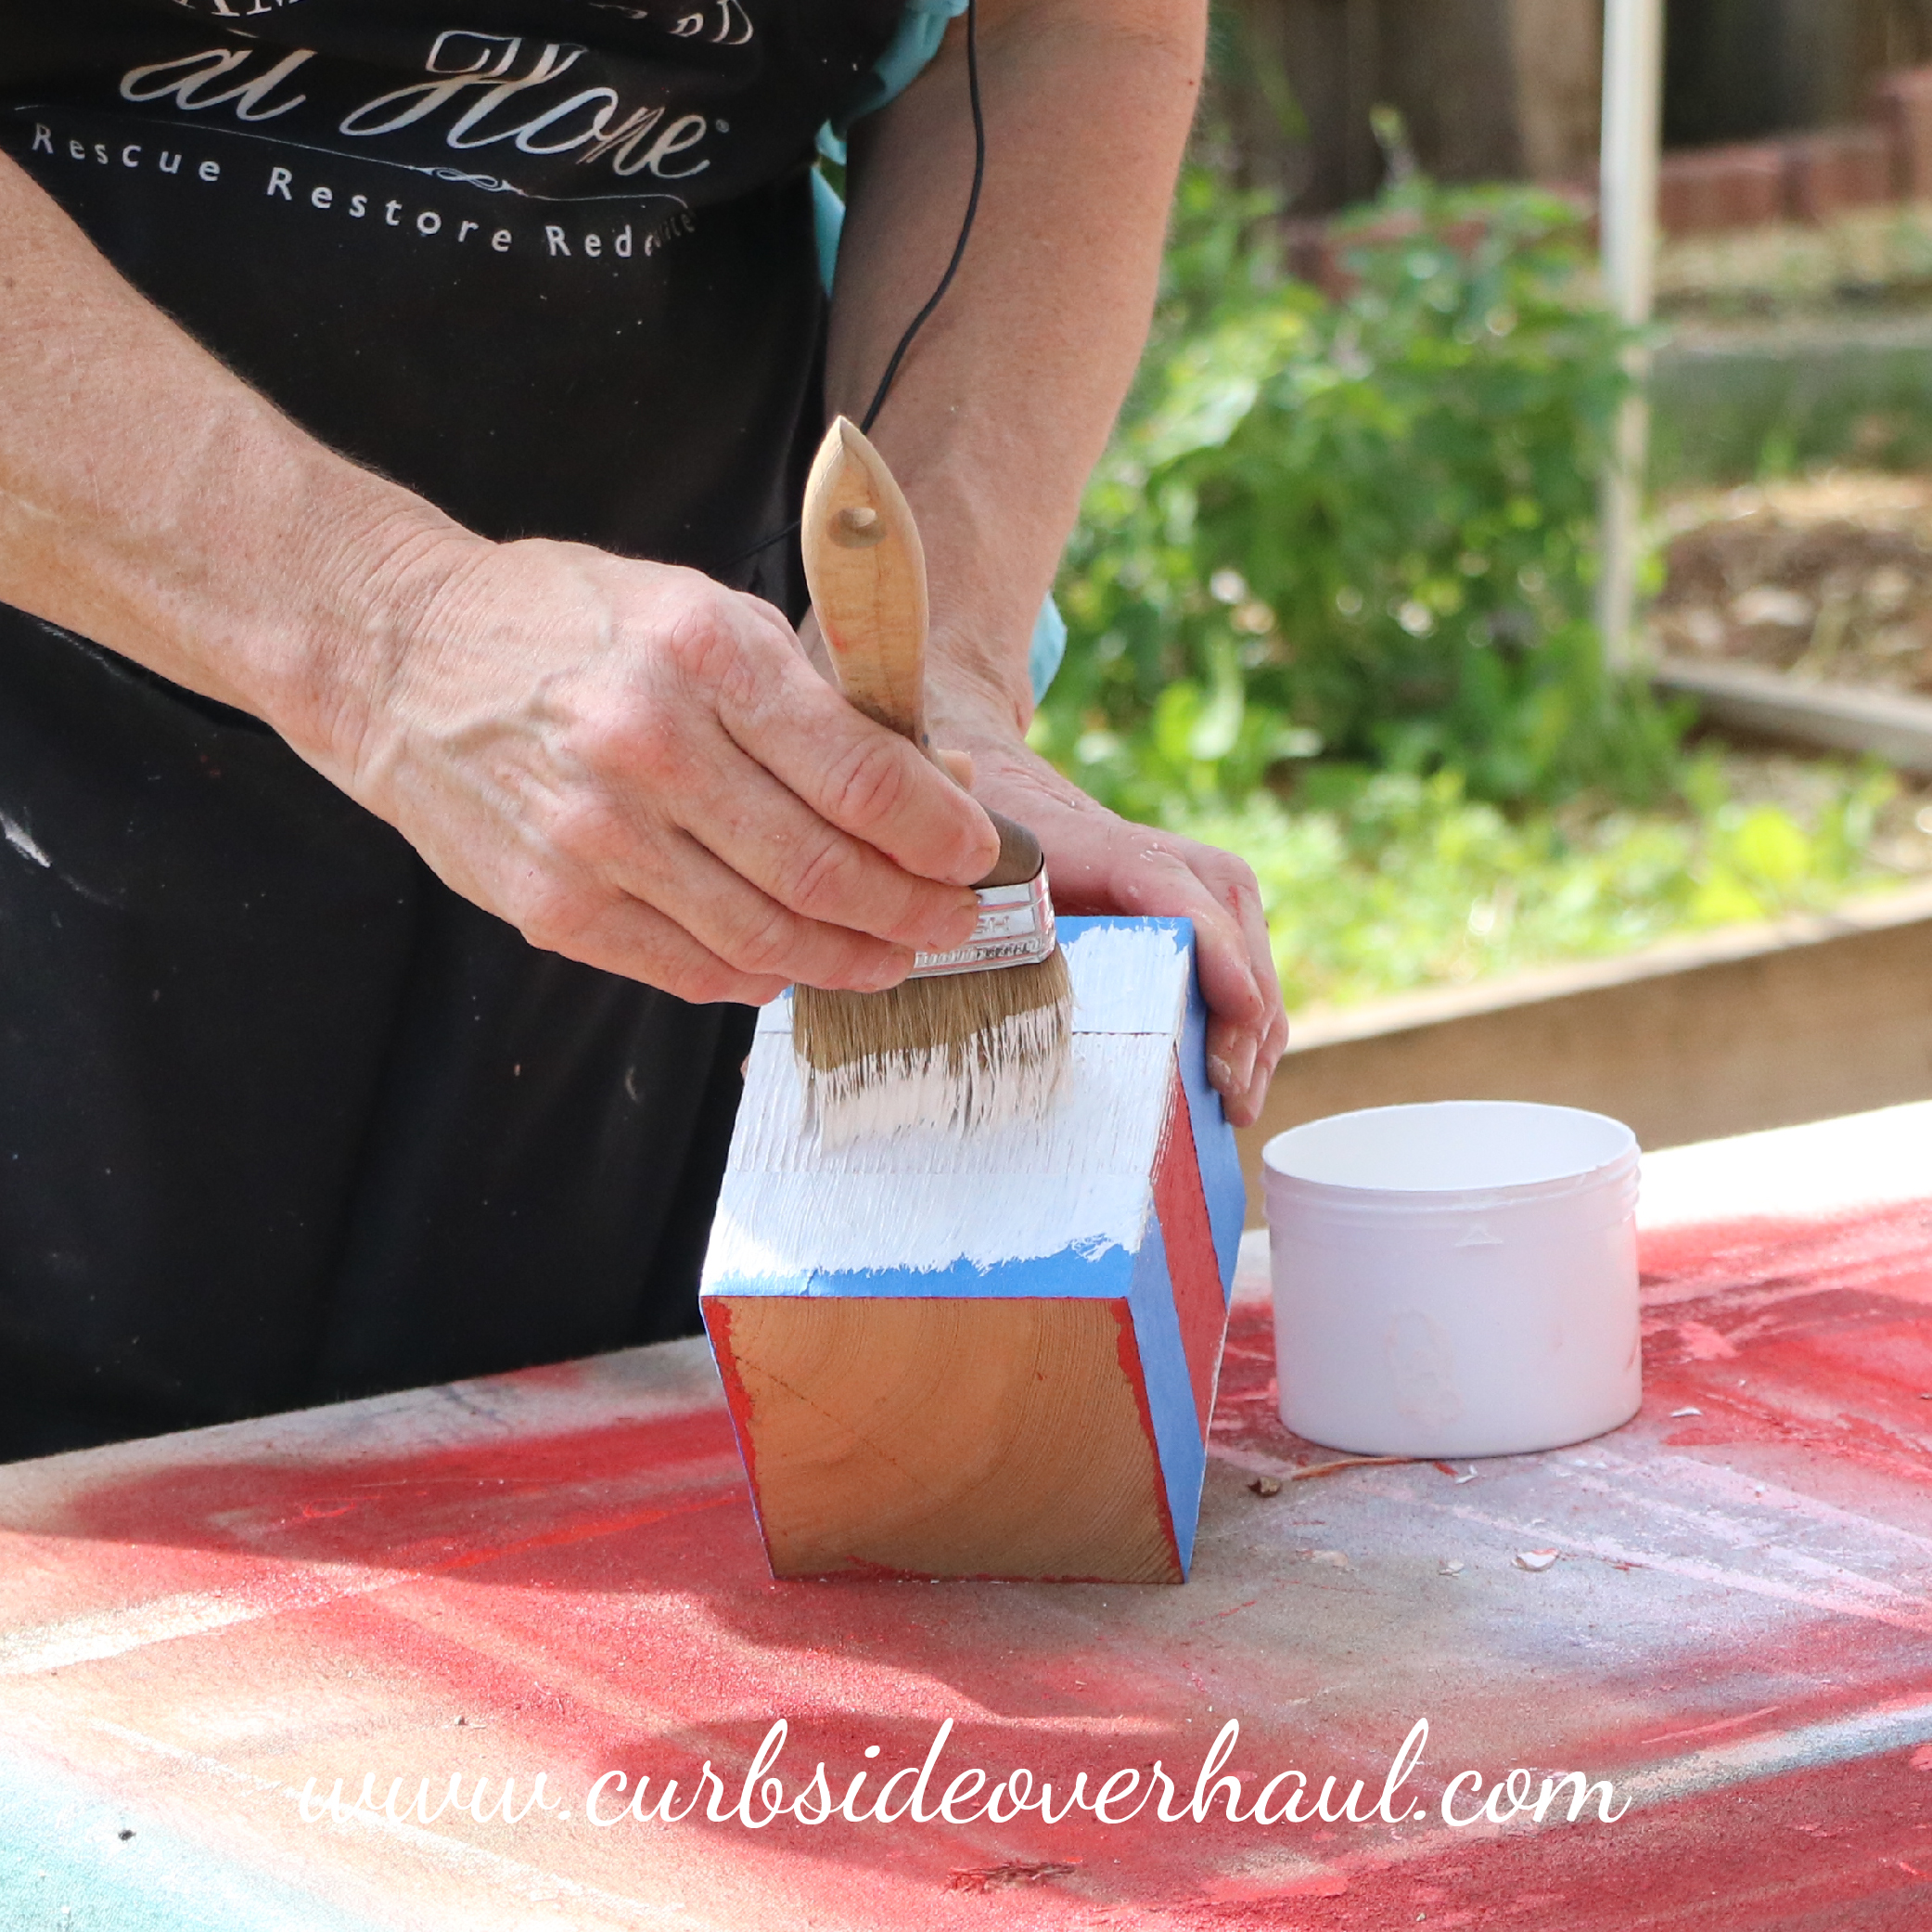
Step Two: Paint Your Blocks
Paint your blocks to fit your home decor. We used white and red for ours, but this is another project that can used all year round, so feel free to use other colors that might suite your home better. You can choose solid colored blocks, but we decided to do stripes like a candy cane.
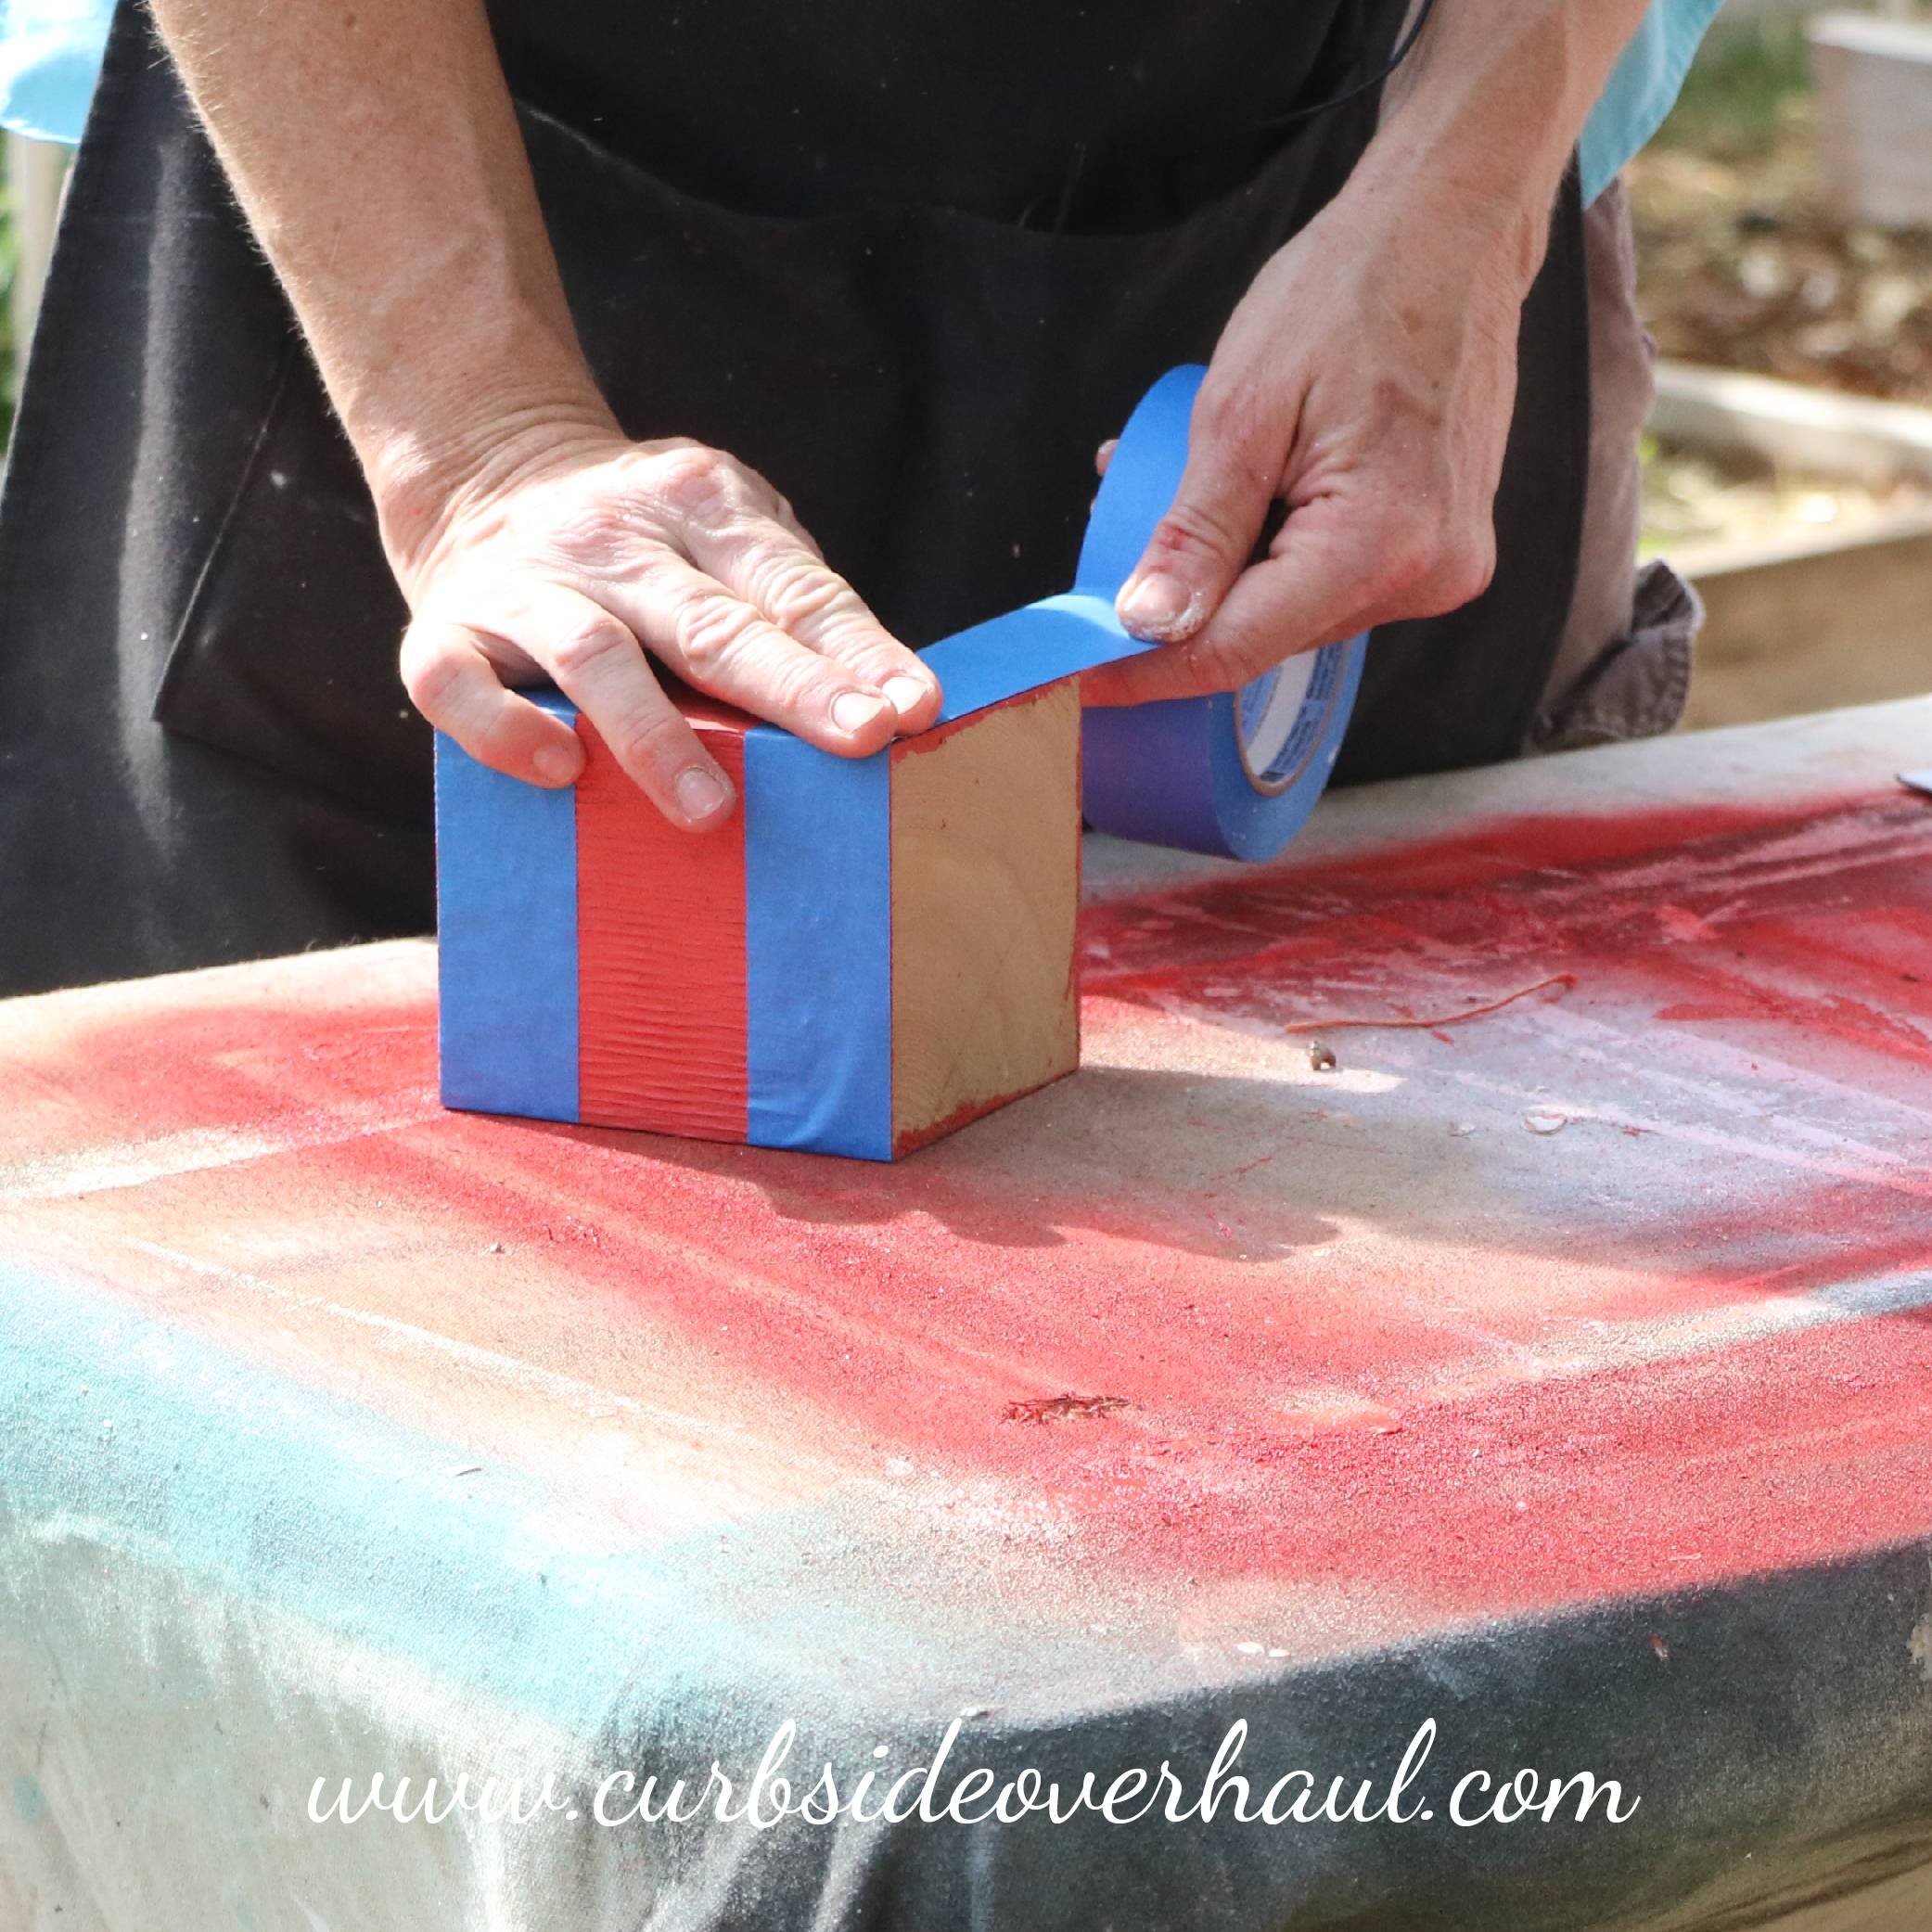
Step Three: Tape Off Your Blocks
Tape off the different sections of your block. The taped part will remain the color of the base. The section in between will be whatever color you’ve chosen. We painted two coats of the based coat.
Step Four: Paint
Sometimes, paint tends to spread where it’s not supposed to. It can get under the tape, but one way to avoid this is to start your brushstrokes on the tape and then onto the surface to be painted. This keeps you from pushing the paint under the tape causing that rough line. Then pull the tape as soon as the paint is dry to the touch.
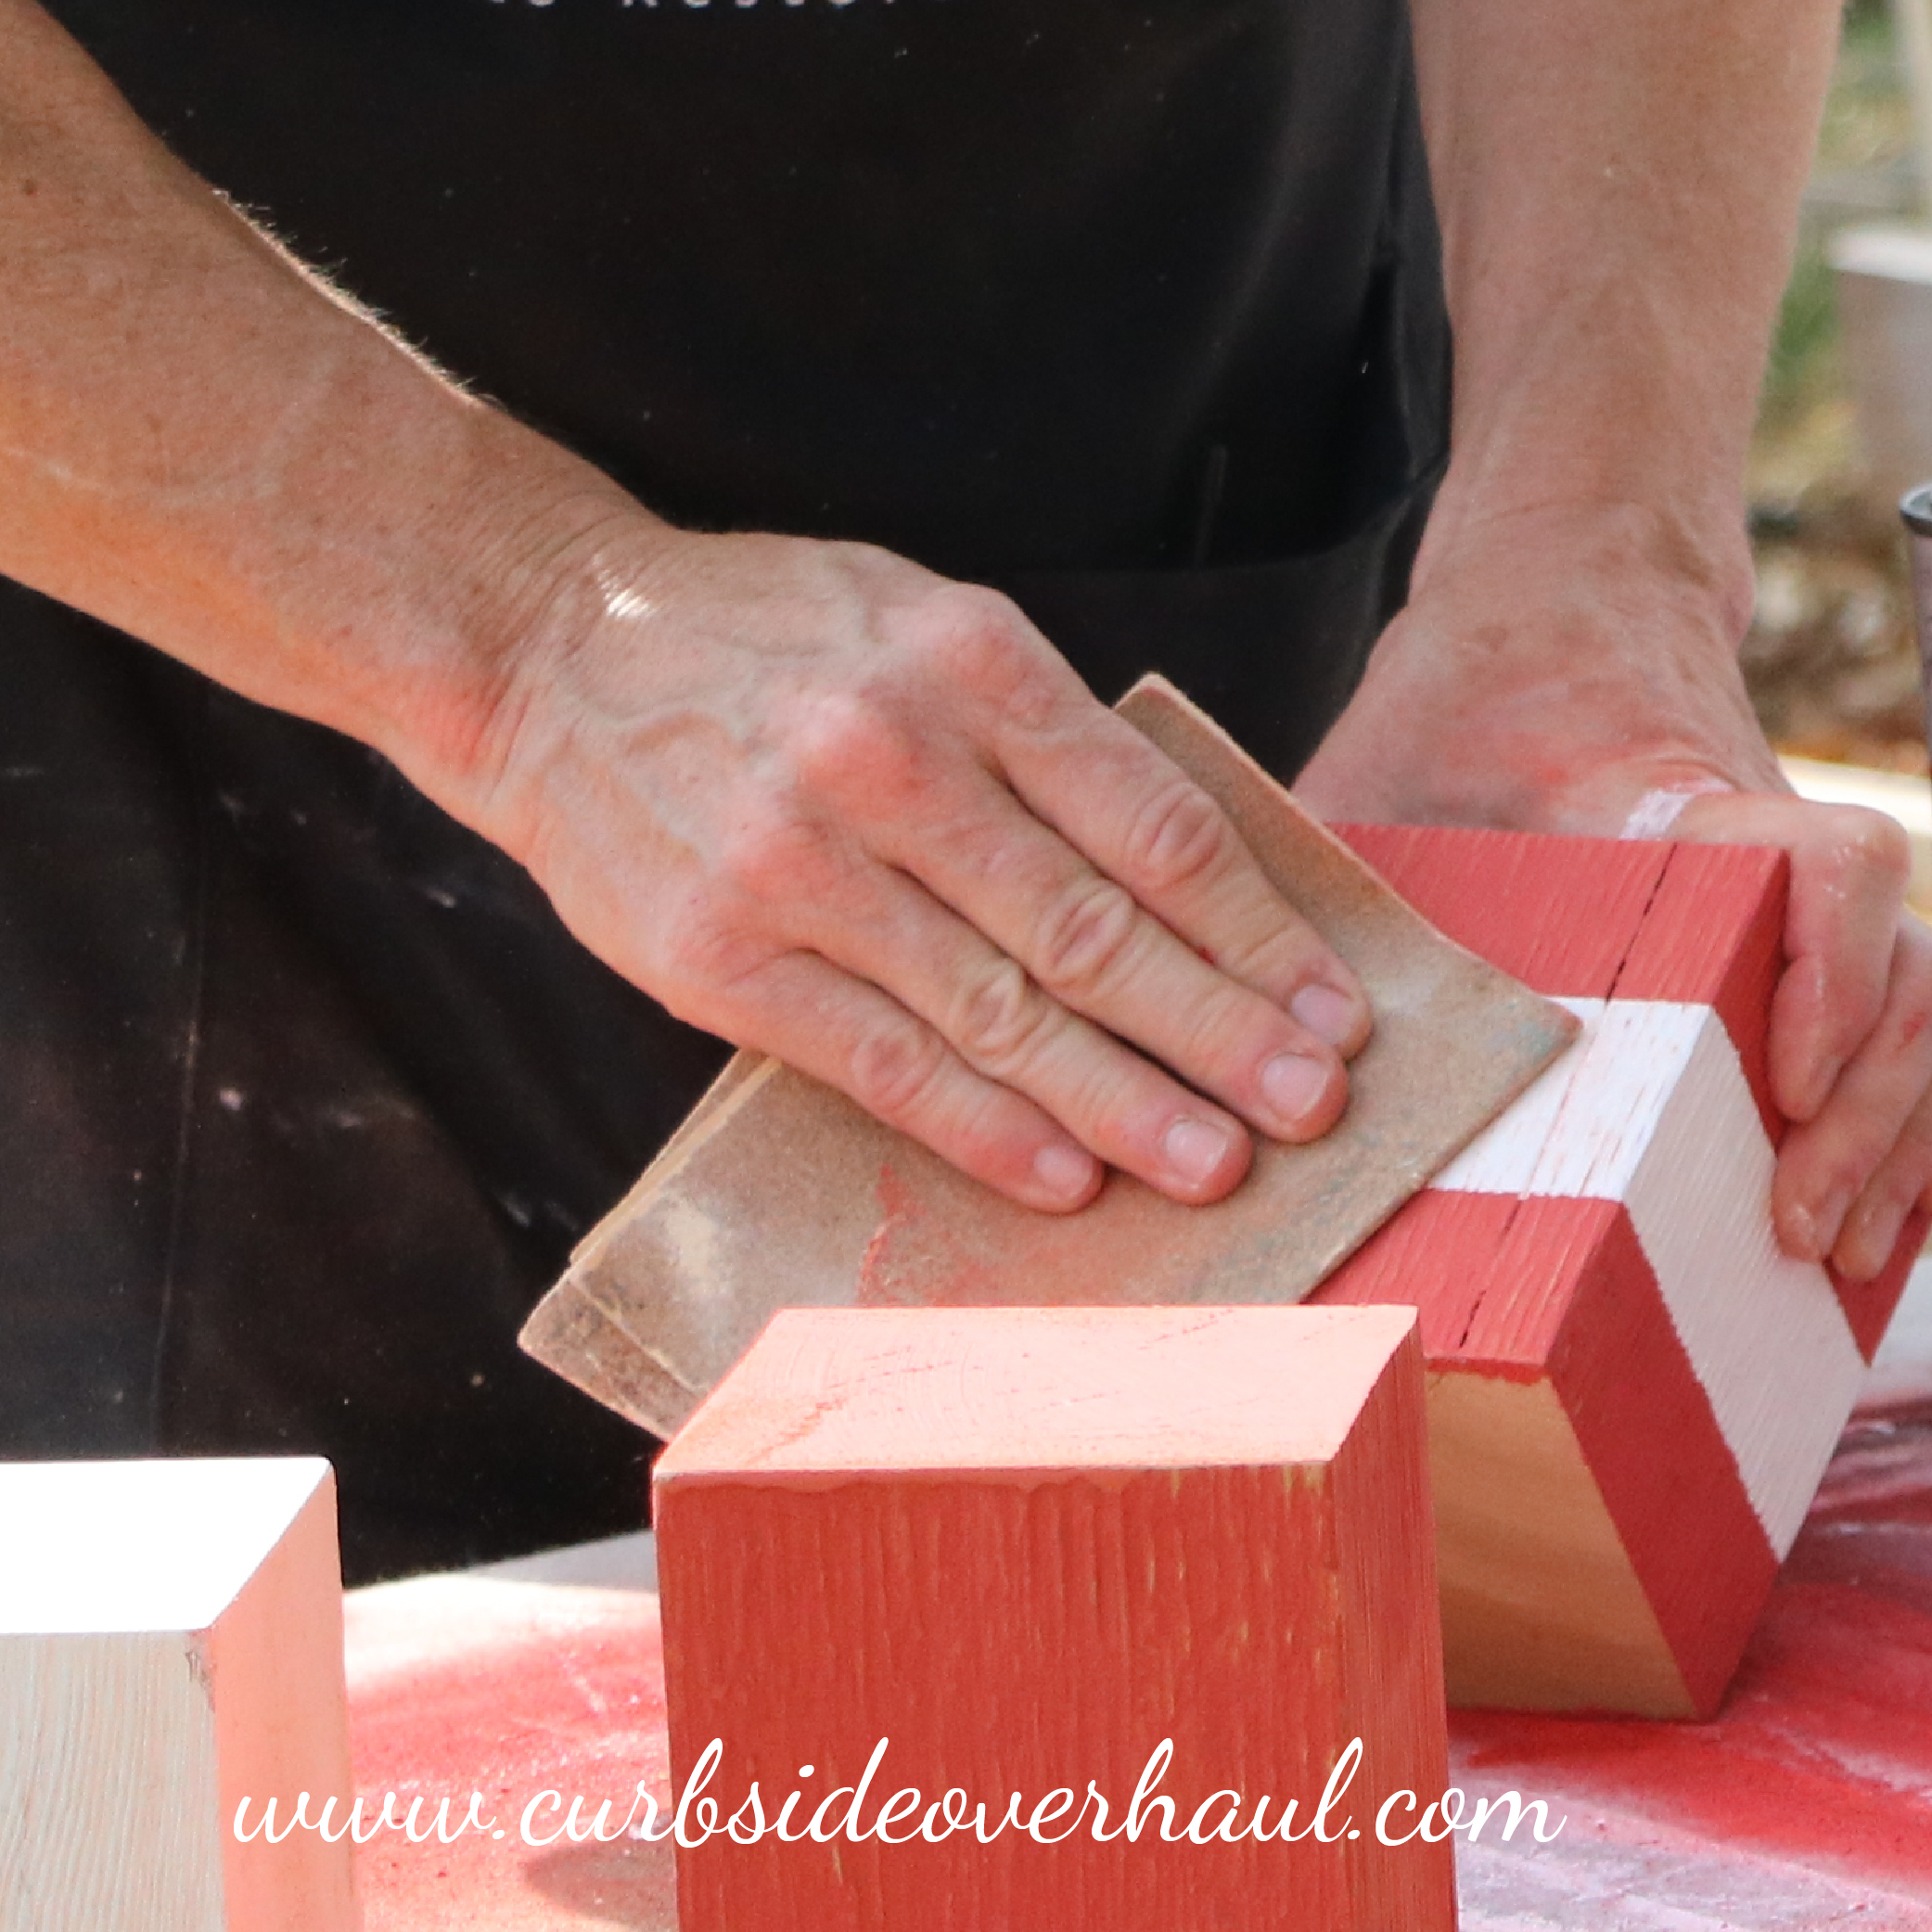
Step Five: Sand
We wanted to keep the rustic and weathered appearance of our wood, so we sanded our secondary color coat to reveal some of the base coat underneath.
Step Six: Add Light Antique Wax
Once your one-step paint has dried, you can brush on the wax. Coat your brush in the light wax and then offload the brush on a piece of cardboard. Offloading will get rid of clumps of wax and ensure the wax comes of your brush evenly. Brush you Light Antique Wax onto your piece with quick, light brush strokes in all different directions. This technique of changing directions prevents brush marks and ensures that you get total coverage without getting too much in one area. For more information on our technique for applying wax, watch our video.
Step Seven: Add Dark Antique Wax
Wait until the Light Antique Wax comes to tack. Tack is when you rub the piece with your fingers and the wax does not feel like it is moving. It will not feel oily but it is also not totally cured.
It is now time to add the dark wax. (Always use Light Antique Wax and Dark Antique Wax together. Dark Antique Wax is not made to be used by itself.) The layer of light wax will keep the dark wax from overwhelming the project.
Lightly load a clean brush with dark wax and offload it on a piece of cardboard until the Dark Antique Wax comes off evenly and slowly. Now you are ready to apply the Dark Wax to your piece. Start at the edges and lightly, with the tips of the brush, begin to add accents by barely brushing the tips against your project. It is usually best to have only about 10 percent coverage with Dark Wax. Think about where the piece will have the most dirt and grime or shadow. Make it look natural.
Step Eight: Sprinkle Dust of Ages
While the Light and Dark waxes are still tacky apply the Dust of Ages. It is important that the tack remain to allow the Dust to bond with the wax.
Dab your brush into the Dust of Ages and let it drop onto the project. Be very generous with the dust and get it into the ever nook and crevice. Dust of Ages will mimic the years that a piece has set untouched and the dust that has settled into all the cracks. Any extra Dust of Ages that’s brushed off can go back into the container future projects.
Dust of Ages has another great property in that it will help polish the surface of the wax giving you a nice slight sheen. Once you have brushed off your candle stick take a clean lint free cloth and ball it up and buff the pumpkin lightly much as you would a shoe.
Step 9: Finishing Touches
Once your project has tried, feel free to add a bow or any other finishing touches to it to add your own personality to it.
And there you have it! Four homemade Christmas projects you can do with very little paint and should cost you next to nothing. We love to see how our readers take these basic techniques and make them their own, so feel free to e-mail chelle@curbsideoverhaul.com so we can add your ideas to our post!
Need some more sustainable Christmas ideas? Check out these great articles!
Edible Gift for a Sustainable Christmas
Waste-Free Holiday Gifts for Co-Workers
[…] Homemade Christmas: DIY Decorations from Around the House […]
These are all so stinking adorable! I love how they turned out and I can’t wait to try some. None of them are super expensive to make either. What a great post!
Thank you! They are so fun to make, so I’m glad the post was enjoyable!
What a beautiful holiday spread! I would love to have something like that in my home…and now I can! Great tutorials. Thanks!
Yay! I’m so glad you like them. Thanks for stopping by to check it out.
These are awesome!!!! Pinning and stumbling.
Thank you!
Ooo! I really love the painted pine cones! They are too cute! I tend to like things that look like they have snow on them haha
We love snow too. I’m glad you like them!
I think homemade gifts are so much more thoughtful. I love your ideas for the candlesticks.
Thank you!
love the photos and how they show you each of the steps. These are some great ideas!! I love the gilded pears.
I’m glad you like the tutorials!
The red and white one is my favorite. Very festive.
Thank you! I’m glad you like them!
[…] Homemade Christmas DIY Decorations […]
[…] decorations from repurposed items from around your house. These are not only eco-friendly, but super inexpensive to […]